Category Archives: Woodcarving

Hobo and Tramp Art Introduction

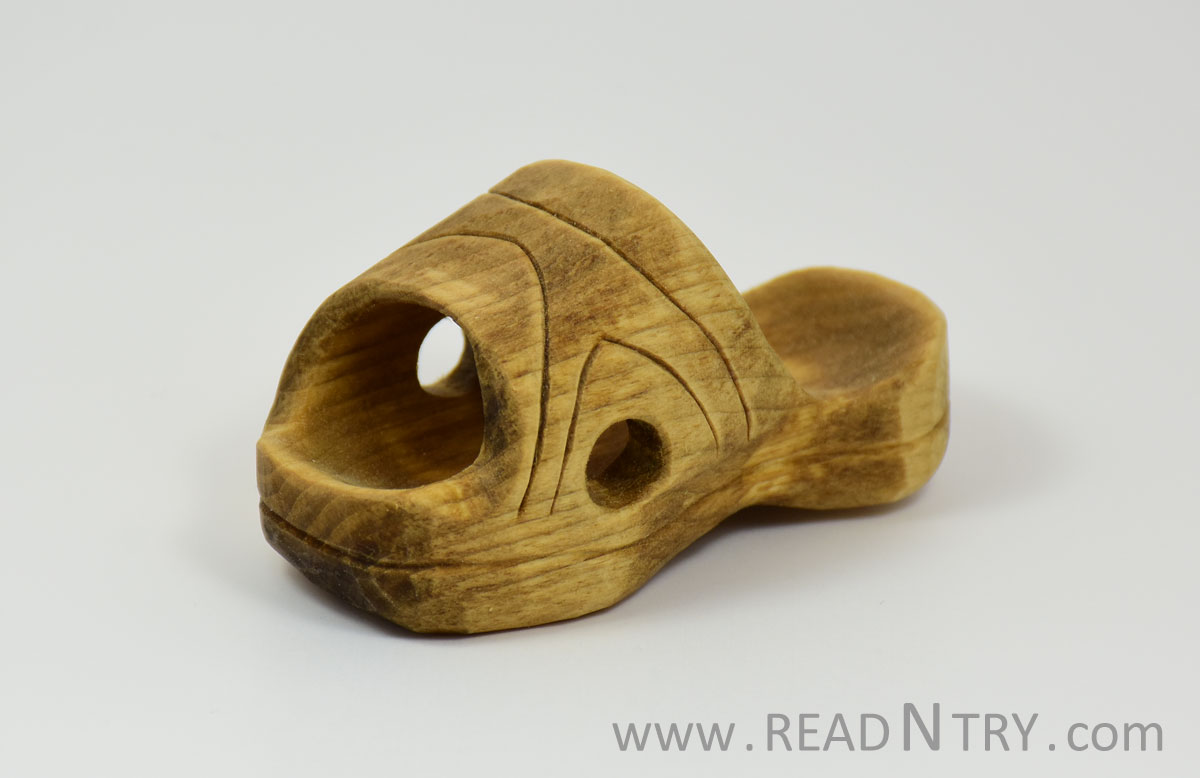
I saw a picture of a wooden box and I was intrigued by the unusual carving style. The picture showed a box decorated with the hobo and tramp carving style which is famous for simple geometric cuts combined with a layered design. I read the “Hobo & Tramp Art Carving: An Authentic American Folk Tradition” book that inspired me to learn more about the hoboes and their carvings.

The Hobo and Tramp carving style originated in the late 19th and early 20th century when a large community of migrant workers and homeless vagrants were living on the road, navigating the rails, crisscrossing the country, finding an occasional job, and making a few bucks here and there. The Hobo community was quite large – up to a several hundred thousand people; they developed their own lingo, special signs, and, fortunately, a unique wood carving style. This Wikipedia page describes the differences between hoboes and tramps.

Part of the picture frame where layered basswood boards are carved with triangle knotches
Layered Notches

Hoboes and tramps spent their spare time whittling with their pocket knives, and they assembled practical projects such as boxes and picture frames. Hobos sold their carvings or traded them for food. Hobos used any wood they could find to make their carvings and they often reused wood from cigar boxes found in garbage piles. Cigar boxes were commonly made from Spanish cedar, eucalyptus, yellow poplar, white oak, basswood, and some other wood. The hobo carving style is simple enough to apply to any available wood of different densities. Carving small incisions on thin boards is easy on almost any wood. Some hobos assembled very unique guitars from cigar boxes that you can see on this Wikipedia page.

Hoboes carved notches on flat strips of wood and nailed those strips in layers as a decoration to create unique 3-D looking pieces of art. Please google images to see Hobo projects.

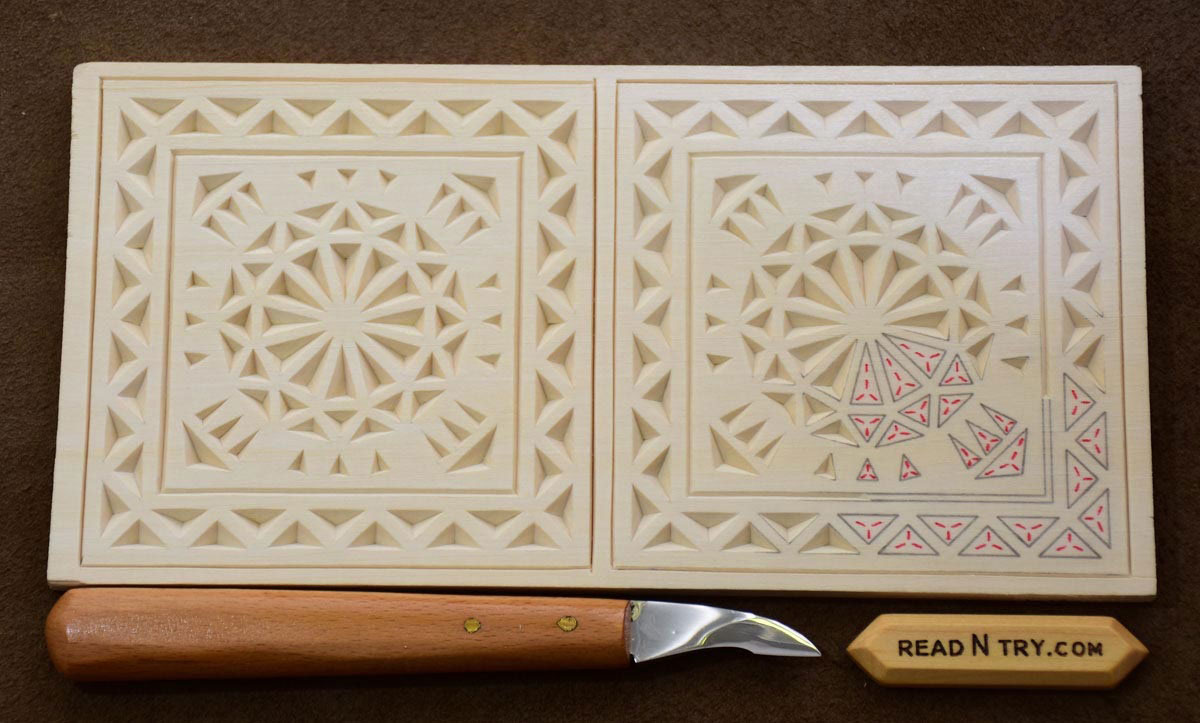
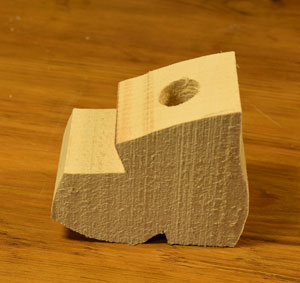
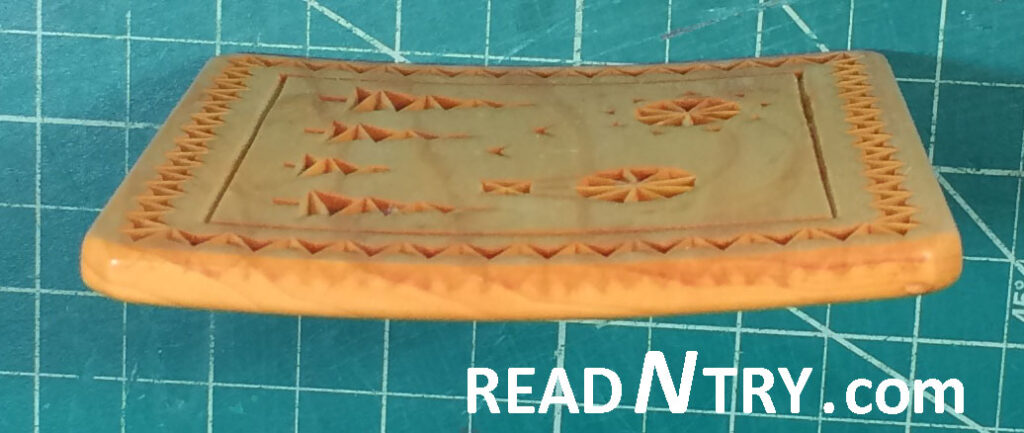
I am currently working on the picture frame shown below. You may see some uncarved notches on the top layer of the frame. I drilled the holes in the corners to align the layers with thin dowels.

Picture frame carved in Hobo and Tramp style
Picture Frame

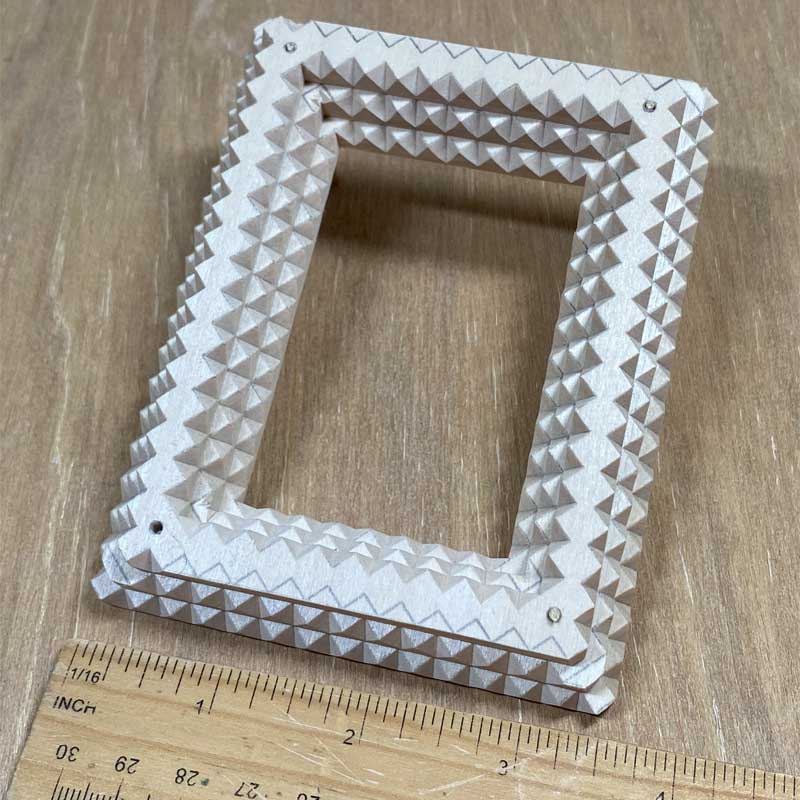
The frame is carved and assembled from three layers of basswood. The size of the frame is 3.5” x 4.5” (9 x 11.5 cm). See a ruler below the frame for the reference.

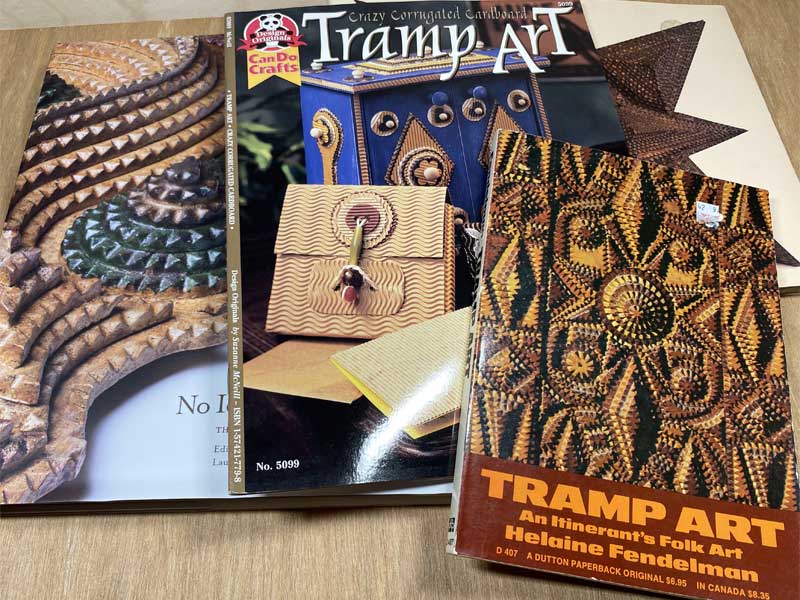
I am planning to add an easel back to the frame. I will share the finished piece a little later. I would invite you to find a book or two and learn more about the distinctive hobo and tramp carving style.

Picture of Hobo and Tramp books
Hobo & Tramp Art Books

Please let me know what you think about the Hobo and Tramp Art in the comments below. Thank you and happy carving!

Board Warping (Cupping and Twisting)

Wood is natural material that sometimes moves unpredictably when moisture in the wood changes unevenly. Chip carving thin boards may release the wood internal stresses on one side of the board and that may lead to board warping, especially cupping.

Probably a half of my chip carved coasters noticeably cup as they are only 1/4″ (6 mm) thick. Let me share what I do about that issue. In most cases I don’t try making them flat as I enjoy using them as is. I like to see how my cup of tea rocks a little on a table. Of cause, it is not very convenient to use a tall wine glass with a cupped coaster. I use that pictured coaster with my morning cup of tea.

Example of a basswood chip carved coaster affected by the board warping. The thin board cupped.
Board Cupping of a Chip Carved Coaster

A few factors make thin boards to cup: moisture content before carving, air moisture level, sometimes heat or direct sunlight. Carving angle and chip sizes may also affect that as the air moisture may penetrate the wood from the carved side much faster.

To make the coasters straight I would suggest a few things.

Before carving:

  • Pick the wood with the straight grain without any defects. Those pieces have minimal internal stresses.
  • Keep the recently acquired wood near your carving place for at least 2-3 weeks before carving where humidity doesn’t change much (home), so the wood moisture level would balance with the environment (acclimatization). Some boards warp (cup or twist) during this stage.
  • You may try submerging the new wood (after acclimatization) in the water for a few (5-20) seconds and let it dry before sanding and/or applying the pattern. If the board warps, it would have been definitely warped after carving. So it is better to detect the warping potential before carving.
  • Carve on the side of the board that was close to the bark when it was inside the log. The reason is that the wood tends to shrink around the pith more than in the outer rings. Also wood tends to shrink around the removed chips. So, carving on the “outer” side of the board may compensate the tendency to cup “inwards”.

While carving:

  • Avoid moving the wood between places with different moisture levels: living room – garage, home – wood carving club, etc.
  • Keep the carving covered with a thick piece of cardboard in between carving sessions to prevent easy access of moisture from the air through the carved chips.
  • Be extra careful and/or avoid using too much water or a mix of water/alcohol to fill the undercutting gaps. One drop of water may be enough to cover an undercutting mistake.

After carving:

  • If the carving is still flat finish it right away. Note that finishing with oils may introduce cupping as the oils penetrate the wood and may mess with the wood a little. I finish my coasters with spray acrylic or refined walnut oil.
  • If a coaster cups very little, sanding the bottom side flat is enough. Even though the carved side will not be completely flat, nobody will notice that most likely.
  • If the coaster heavily warped put it under a heavy stack of books for a month or so before applying a finish. It may be flat or lightly curved after all that weight. You may even experiment and putting a coaster under books in a place where moisture changes a lot, such as garage or even outside.

I heard about this technique but have never tried it yet: wet only one side of the board and let it dry, the cupping will decrease. Repeat until the cupping disappears. Wet the right side of the board 🙂

Overall, moisture makes the wood to move… actually CHANGES in the moisture levels and temperature fluctuations make the wood to move.

All my coasters are 1/4″ thick, 3.75 x 3.75″, basswood. Thicker boards warp (cup or twist) significantly less but thinner coasters look nicer. Please visit the READ N TRY Online Store to review available boards with the coaster patterns that are ready to be carved

Embellishment

Let me share my favorite embellishment technique with you:

Woodburning tip: Skew

I like using a wood burning tool to outline the pattern borders before coloring. That helps me to achieve two things:

  • Emphasize perimeter lines by making them dark/black. Accenting coloring with black lines is a popular technique that some painting artists use (especially water-color and pastel painters).
  • Prevent paint bleeding across the borders. Outlining with a wood-burning tool works similar to scoring borders with a sharp knife. The idea is to cut/separate wood fibers so the paint does not bleed across the borders.

Strawberry Bowl

The “Strawberry Bowl” project was turned from basswood and embellished using the described technique. The bowl is 4” (10 cm). It was painted using felt-tip markers. The finish is acrylic spray.

The markers are very bright and fit the Christmas season very well. Other seasons I like using acrylic paint (heavily diluted with water): it is much easier to handle and it may look bright or soft as needed. I apply at least two coats of diluted acrylic paint to achieve better color-particle distribution that is thin enough to keep the wood grain still visible through.

Turned Bells

These bells were turned from maple and were embellished with diluted acrylics and finished with Tung oil. You may see the grain through the painted leafs. The pieces of maple wood were almost white but after applying oil it darkened the wood a little and exposed the before-non-visible grain.

The embellishment ornaments were drawn, burned, and painted freehand (no stencils used). It required a steady hand, time, and magnifying glasses. Using good paint brushes helps a lot.

Happy Carving & Turning,
Roman

Boards with Chip Carving Patterns

You may buy the highest quality basswood boards with applied chip carving patterns; they are ready for chip carving. These basswood boards are smooth but not sanded. A computerized system is used to apply the patterns with a regular mechanical pencil (0.5 mm) for easy clean-up.

The board size is 1/4 x 4 x 8″ (0.6 x 10 x 20 cm). The patterns are applied with narrow margins so the carved and finished square coasters will be 3.75″ (9.5 cm) in size.


Basswood board with applied pattern: Dandelion
Board Size: 1/4 x 4 x 8″ (0.6 x 10 x 20 cm)
$18 | Free Shipping within the US

Board with Dandelion design; it includes two chip carving patterns.

Basswood board with applied pattern: Supernova Square
Board Size: 1/4 x 4 x 8″ (0.6 x 10 x 20 cm)
$18 | Free Shipping within the US


Basswood board with applied pattern: Supernova Round
Board Size: 4 x 8 x 1/4″ (10 x 20 x 0.6 cm)
$18 | Free Shipping within the US


Read more about the chip carving patterns in my post about Coaster Patterns. Let me know if you would like to get more patterns ready to carve on the high quality basswood. If you comment below please specify the pattern name you tried. Thank you!

Find more boards with chip carving patterns in the READ N TRY online store.

Rosette Chip Carving Practice Board

The highest quality basswood is used to manufacture these chip carving practice boards. This board includes several different rosette patterns and it is great for advanced as well as for expert chip carvers. We pre-carve examples so you could see how different chips should be carved. Click on the image below to enlarge the pattern.

Rosette Chip Carving Practice Board

$17 | Free Shipping to US & Canada


We transfer the patterns using our computerized system to achieve the ultimate precision. A regular mechanical pencil is used for drawing the chip triangles (so it is easy to clean-up) and a red pen is used for highlighting the middle dash lines.

The board features mostly 3-corner chips arranged in circles and rings to form rosettes; these are standard chips with all three facets carved with the same angle. One rosette features 4-corner chips; those chips are carved by using vertical cuts on two sides.

Board Size: 4 x 8 x 1/4″ (10 x 20 x 0.6 cm). The board is 1/4″ (6 mm) thick; it is designed for carving with the angles up to 65 degrees. With the steeper carving angles and/or deep undercutting it is possible to cut through the board; use solid material under the board while carving to avoid accidents. We found that the board thickness is perfect to avoid/unlearn a heavy undercutting habit/mistake.

The board surface is flat but not polished; you may see some very minor tool marks from a thickness/surface plainer on the board. If a surface is sanded the wood fibers will keep some abrasives from sand paper that may dull a chip carving knife faster; therefore we don’t sand the boards. Please contact learn@readNtry.com if you would like to get a sanded practice board as a custom order.

Don’t forget to sign and date your practice board; it may be helpful when you find your carved board decades later. Read a story about how the chip carving practice board project started, tips, feedback, comments and see examples of carved practice boards.

4 Corner Chip Carving Practice Board

The highest quality basswood is used to manufacture these chip carving practice boards. This board includes multiple classic Old-World-Style chip carving patterns that require vertical cuts on two sides of a chip. This board can be carved using both modern and old styles of chip carving with your regular chip carving knife. This board is great for advanced and for experienced chip carvers. We pre-carve examples so you could see how different chips should be carved. Click on the image below to enlarge the pattern.

4 Corner Chip Carving Practice Board


$16 | Free Shipping to US & Canada

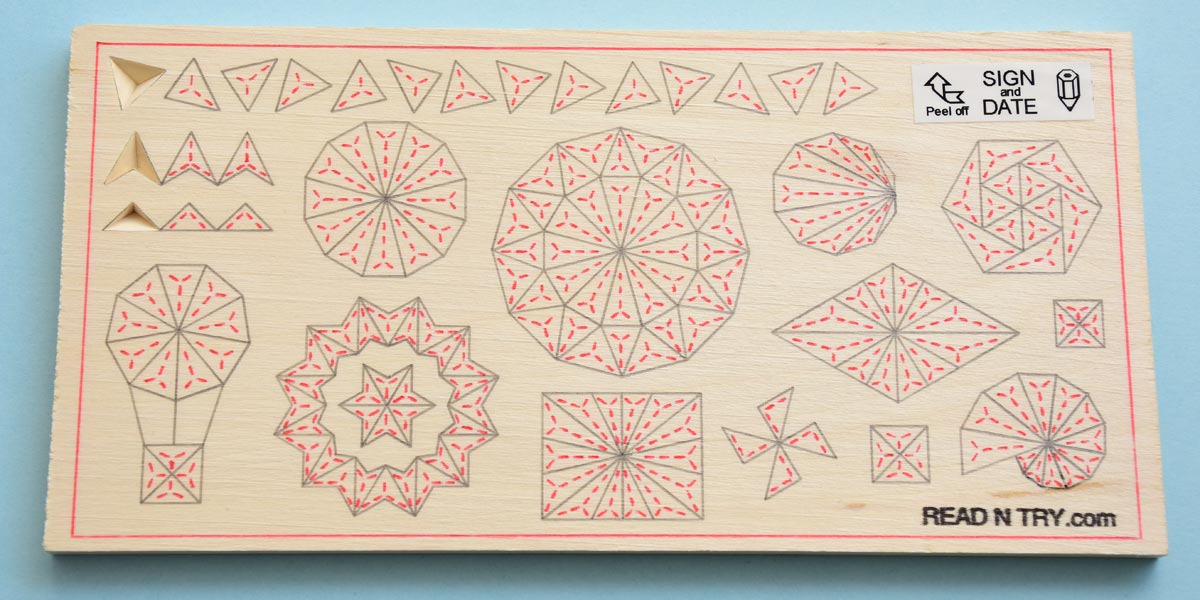
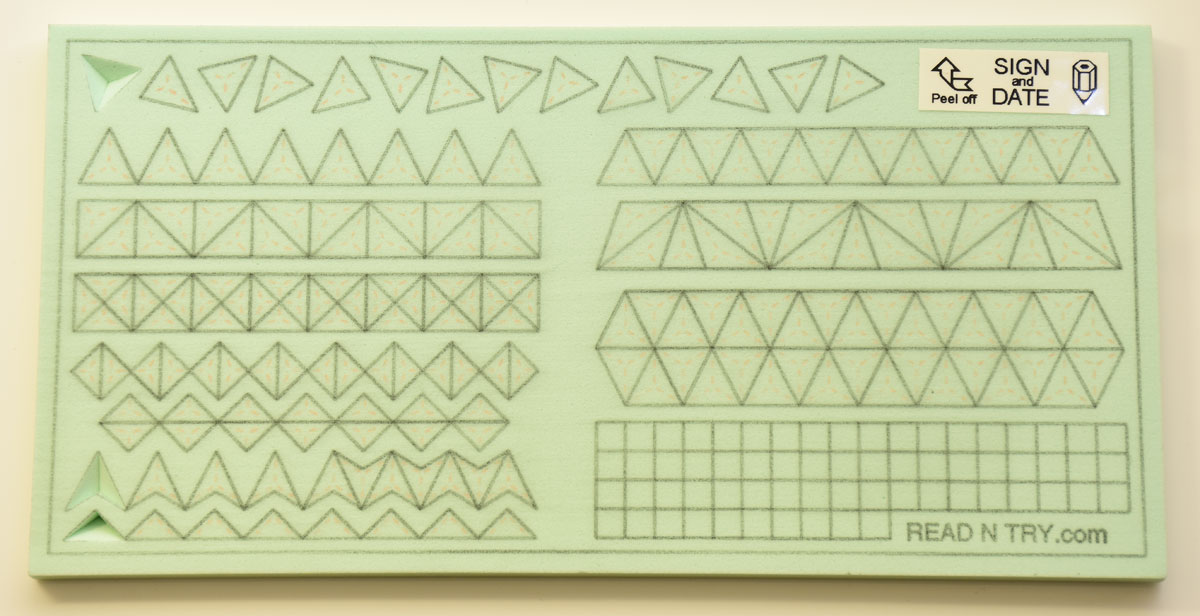
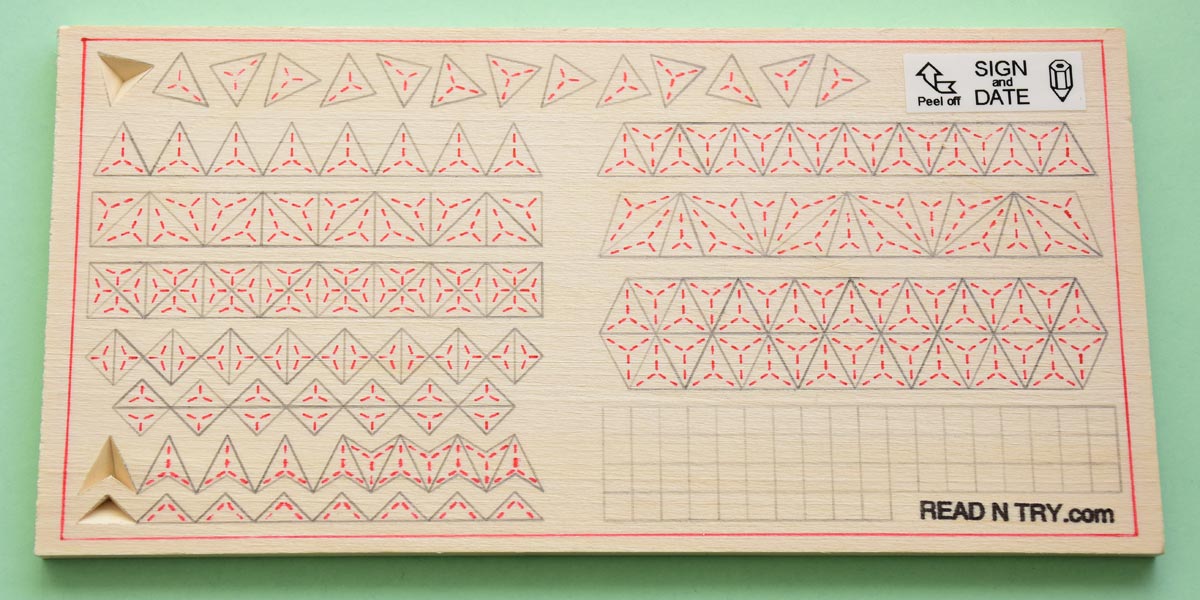
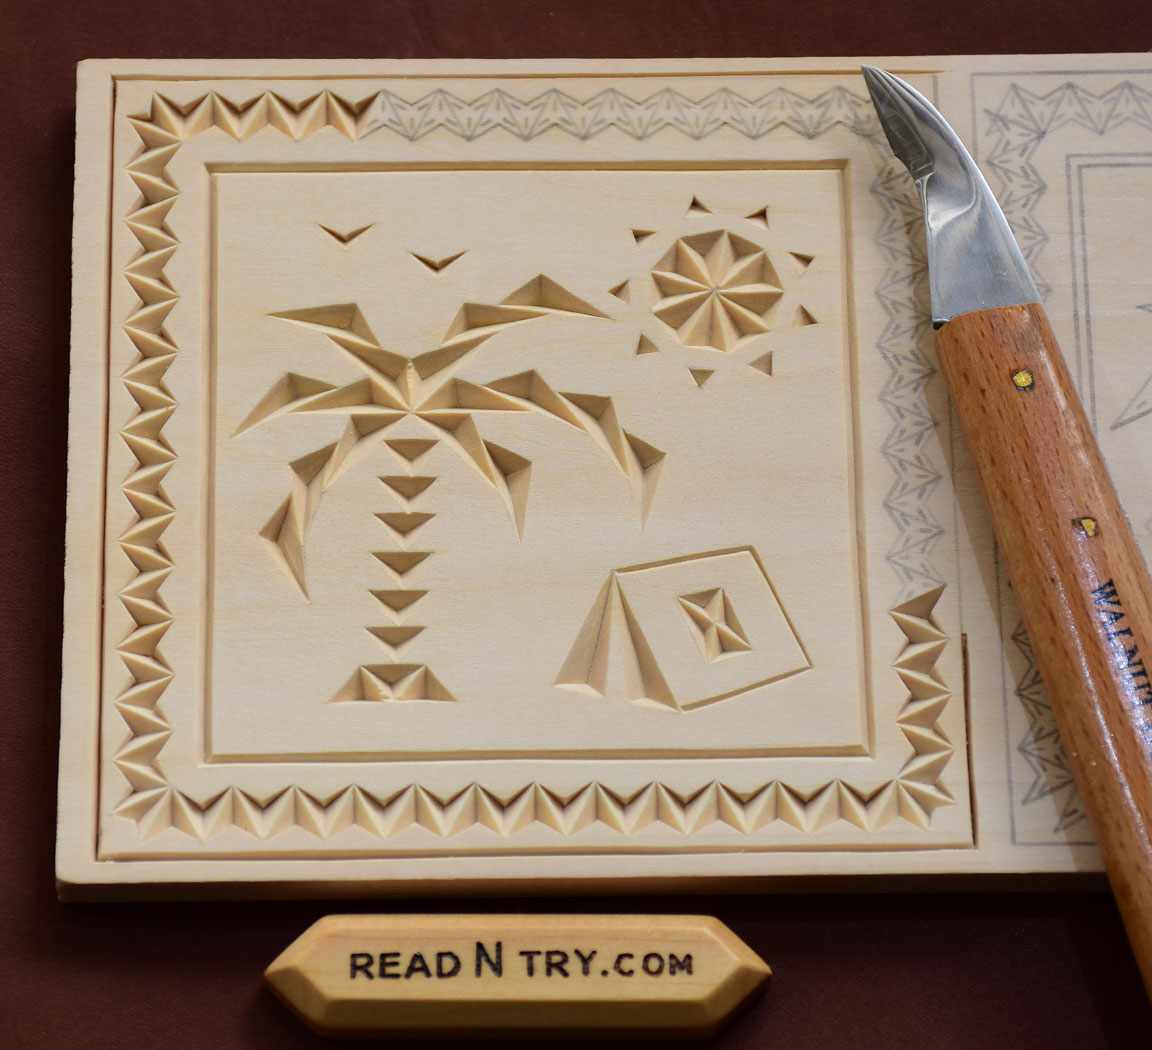
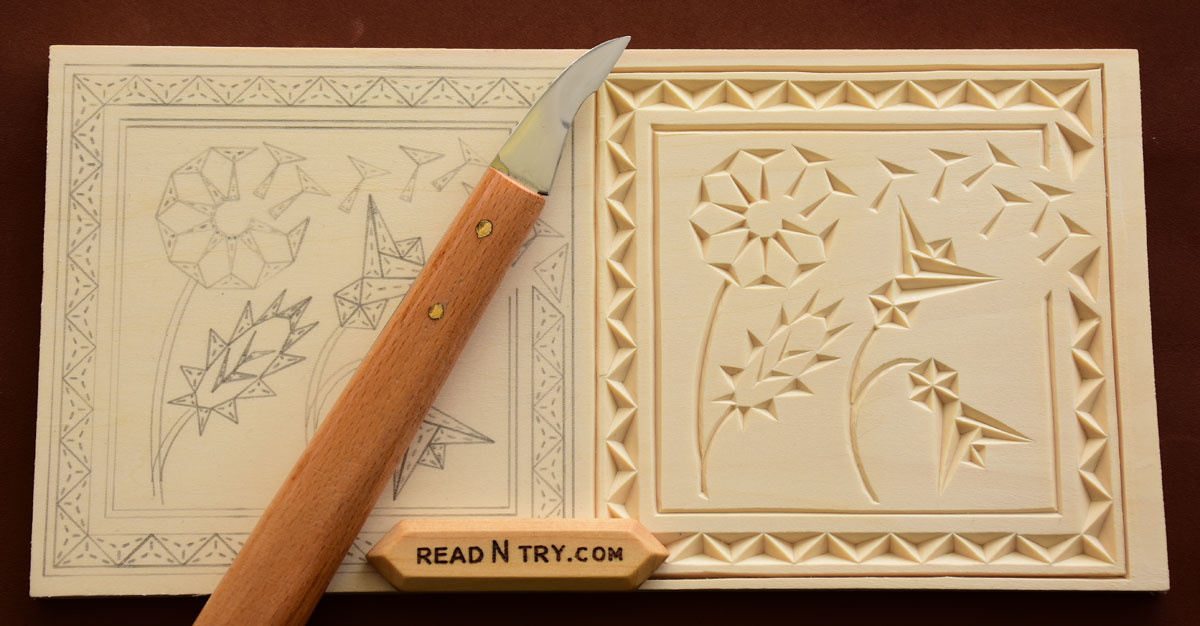
The board features mostly 4-corner chips arranged in various ways; these are traditional chips used in old-world style of chip carving where vertical cuts are used on two sides of the chip. The board also includes standard 3-corner chips on top, so you could “feel” the board. The last pattern on the left shows an example of how 3-corner chips and 4-corner chips may be nicely combined.

Notice how we draw the chips with vertical cuts: the dash lines are placed very close to the solid lines of the chip borders on the internal side of the chip to indicate vertical cuts. These cuts are done by holding a chip carving knife vertically about 90 degrees to the board. Experiment with the vertical cuts by holding the knife at 85, 80, or 70 degrees, so they become almost vertical, to achieve different effects.

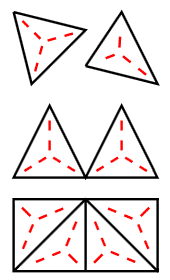
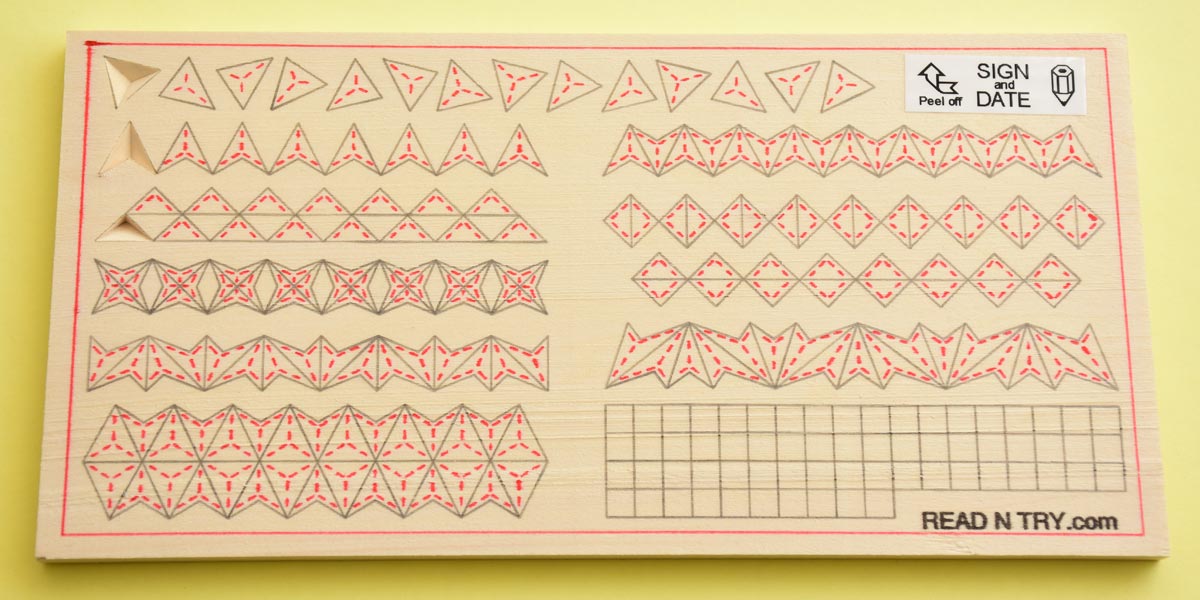
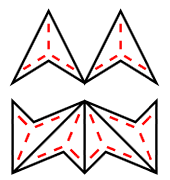
The third row of patterns features an interesting kind of chips: three corner chips where two sides are done using vertical cuts. These traditional chips are relatively easy to carve; they have a unique play of light and shade. Not sure what is the right English name for those chips but the translated name from Russian is “Splitters” (“Сколыши”).

Board Size: 4 x 8 x 1/4″ (10 x 20 x 0.6 cm). The practice board is 1/4″ (6 mm) thick; it is designed for carving with the angles up to 65 degrees. With the steeper carving angles and/or undercutting it is possible to cut through the board; use solid material under the board while carving to avoid accidents. We found that the board thickness is perfect to avoid/unlearn a heavy undercutting habit/mistake. The board includes a grid area at the bottom right. You could repeat some existing patterns there or draw a new design or two to practice more.

The board surface is flat but not polished; you may see some very minor tool marks from a thickness/surface plainer on the board. If a surface is sanded the wood fibers will keep some abrasives from sand paper that may dull a chip carving knife faster; therefore we don’t sand the boards. Please contact learn@readNtry.com if you would like to get a sanded practice board as a custom order.

We transfer the chip carving patterns using our computerized system to achieve the ultimate precision. A regular mechanical pencil is used for drawing the chip borders (so it is easy to clean-up) and a red pen for highlighting the middle dash lines.

Don’t forget to sign and date your practice board; it may be helpful when you find your carved board decades later. Read a story about how the chip carving practice board project started, tips, feedback, comments and see examples of carved practice boards.

EZboard 3-Corner Chip Carving Practice Board

Green EZboard material from EZcarving.com is used to manufacture these chip carving practice boards. This popular board includes multiple classic 3-corner chip patterns and it is great for beginner as well as for experienced chip carvers. The EZboard material is very soft — it is softer than basswood and does not have grain — it is ideal for kids, first-time carvers, and carvers who experience sore hands. We pre-carve examples so you could see how different chips should be carved. Click on the image below to enlarge the pattern.

3 Corner Chip Carving EZboard Practice Board


$18 | Free Shipping to US & Canada
Out of stock. Coming soon.

We transfer the patterns using our computerized system to achieve the ultimate precision. A regular mechanical pencil is used for drawing the chip triangles and a red pen or pencil for highlighting the middle dash lines.

The board features mostly 3-corner chips arranged in various ways; these are standard chips with all three facets carved with the same angle. The board includes a grid area on the bottom right. You could repeat some existing patterns there or draw a new design or two to practice more.

Board Size: 4 x 8 x 1/4″ (10 x 20 x 0.6 cm). The board is 1/4″ (6 mm) thick; it is designed for carving with the angles up to 65 degrees. With the steeper carving angles and/or undercutting it is possible to cut through the board; use solid material under the board while carving to avoid accidents. We found that the board thickness is perfect to avoid/unlearn a heavy undercutting habit/mistake.

Two rows on the bottom left of the board feature a different type of chips for you to try — we pre-carved those chips as well. Those chips are carved by using vertical cuts on two sides of a chip.

Don’t forget to sign and date your practice board; it may be helpful when you find your carved board decades later. Read a story about how the chip carving practice board project started, tips, feedback, comments and see examples of carved practice boards.

3 Corner Chip Carving Practice Board

The highest quality basswood is used for manufacturing these chip carving practice boards. This popular board includes multiple classic 3-corner chip patterns and it is great for beginners as well as for experienced chip carvers. I pre-carve 3 chips so you could see how different chips should be carved. Click on the image below to enlarge the pattern.

3-corner chip carving practice board features traditional chip carving patterns.
3 Corner Chip Carving Practice Board

$18 | Free Shipping to US & Canada


I transfer the patterns using a computerized system to achieve the ultimate precision. A regular mechanical pencil is used for drawing the chip triangles (so it is easy to clean-up) and a red pen for highlighting the middle dash lines.

The board features mostly 3-corner chips arranged in various ways; these are standard chips with all three facets carved with the same angle. The board includes a grid area on the bottom right. You could repeat some existing patterns there or draw a new design or two to practice more.

Board Size: 1/4 x 4 x 8″ (0.6 x 10 x 20 cm). The board is 1/4″ (6 mm) thick; it is designed for carving with the angles up to 65 degrees. With the steeper carving angles and/or undercutting it is possible to cut through the board; use solid material under the board while carving to avoid accidents. I found that the board thickness is perfect to avoid/unlearn a heavy undercutting habit/mistake.

The basswood board surface is flat but not polished; you may see some very minor tool marks from a thickness/surface plainer on the board. If a surface is sanded the wood fibers would keep some abrasives from sand paper that may dull a chip carving knife faster; therefore the the boards are not sanded.

Two rows on the bottom left of the board feature a different type of chips (4-corner chips) for you to try — I pre-carved those chips as well. Those chips are carved by using two vertical cuts on two beveled cuts.

Don’t forget to sign and date your chip carving practice board; it may be helpful when you find your carved board decades later. Read a story about how the chip carving practice board project started, tips, feedback, comments and see examples of carved practice boards.

Chip Carving Coaster Patterns

After chip carving my previous design that was a combination of my free chip carving patterns I decided to design a few more unique chip carving coaster patterns. I challenged myself with the goal of using only three corner chips with straight edges; I try using lines and rectangle chips as sparingly as possible.

Even though some patterns below depict easily recognizable things this is not a free style chip carving. These chip carving patterns can be carved using simple classic chip carving techniques.

The boards are 8 x 4″ (20 x 10 cm). They are 1/4″ (6 mm) thick. I found that thickness is ideal for coasters. I like carving two coasters at a time as it is easier to hold a larger board while carving.

Supernova

This chip carving pattern reminds me an exploding star, so I named this chip carving pattern: Supernova. Two versions of the patterns are available in the store: Square and Round.

Supernova pattern is part of my collection of chip carving coaster patterns. This pattern is specifically designed for beginners however it also can be enjoyed by expert carvers.
Chip Carving Pattern Supernova

Supernova chip carving pattern is an ultimate project for new chip carvers. To make it an easier project I placed the chips apart, so no two chips share the same edge. That makes the project forgiving to some common mistakes that lead to broken or uneven ridges such as excessive undercutting and curved cuts. One coaster has 108 three corner chips.

Buy a basswood board with the applied Supernova pattern from my online store.

Chip Carving Coaster Patterns: Camping

The “Camping” coaster design consists of 153 chips including 104 four-corner chips for the border. Work is still in progress. It was a challenge to combine a recognizable palm using only 3 corner straight chips. The palm trunk is straight; I am thinking making it a little curved next time.

Chipcarved Coaster. Camping

Well, I broke one or two ridges while carving the coaster. Since I usually carve the designs in pairs I hope the second coaster will be a better one.

Chip Carving Coaster Patterns: Dandelion

The pattern’s name is “Dandelion”. It consists of 123 standard 3-corner chips with all straight edges. It is very easy to carve.

Dandelion Coasters. Work in progress

I like the scene dynamic: a gust of wind not just bends the flowers on the right and disturbs the dandelion but also helps the dandelion flakes to break the wall/border.

All coasters carved above are carved on basswood boards 1/4 (6 mm) thick. Buy a basswood board with the applied Dandelion pattern from my online store.

I will update that post with several other patterns as I carve them.

Carving Shoes

My friend, Ron, gave me a basswood roughout for a cowboy boot and asked me to carve it. I wanted to carve something unexpected, so I carved a flip-flop as a light-hearted joke. I enjoyed carving it so I decided to carve more different shoes… That is how the “Lost & Found Shoe Rack” project started. The shoes are about 3″ (7 cm) long.

Lost & Found Shoe Rack

I designed the shoe rack that also looks like a shoe. All three shoes are finished with Tang oil.

Flip-flop

Carved Flip-Flop

Clog

Carved Clog

The project attracts a lot of attention from the visitors of wood carving shows. Several people told me that the clog reminded them some clog museums they visited in northern Europe.

One boy told me that the proper name for that clog is “Elf’s shoe” 🙂

Sandal

Carved Sandal

The sandal is finished with the dark Tang oil.


I am proud to say that the project won the Best Of Show award in the Novice category during the SCVC Show in San Jose, CA in 2015. After winning with that project I was notified by the club members that I am not a novice wood carver anymore. Delighted!

Boot Rough-out. 3″ (7 cm) long


This is a basswood rough out that has started this whole story. 🙂