Category Archives: Pyrography

Air Quality PM2.5

I was concerned about air quality during sanding of my wooden projects. I use N-95 respirators and HEPA air purifies for safety but I couldn’t quantify the air quality to see if my safety measures are adequate or not. Eventually measuring air quality became a topic of interest. Let me share my findings.

Winix HEPA Air Purifier on a floor

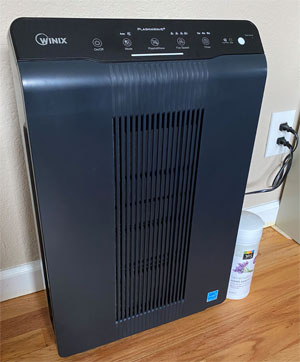
In addition to using a Festool dust extractor I have one of these Winix air purifiers near my wood sanding place. I noticed that it catches not only fine wooden particles but also some dust.

While cleaning the filters according the manufacturer instructions I was glad to learn that the caught dust ended up in the filters and not in the lungs so I placed quite a few of those HEPA air purifiers around my house.

This particular Winix model is two feet high (60 cm) and comes with a remote.

EG Air Quality Sensor showing PM2.5 = 367 and PM10 = 425

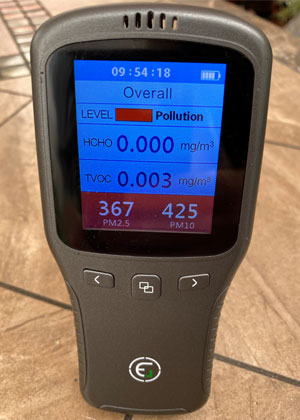
I also got an air quality monitor that measures fine particulate matter (PM, <2.5 microns in size — PM2.5) as well as formaldehyde, and TVOC (total volatile organic compound).

This particular model shows PM measurements using mg/m3 concentrations. The included instruction provides the PM2.5 Level Interpretation table based on the EPA standards.

The reported values in mg/m3 may be different from the “Air Quality Index” that may be calculated differently.

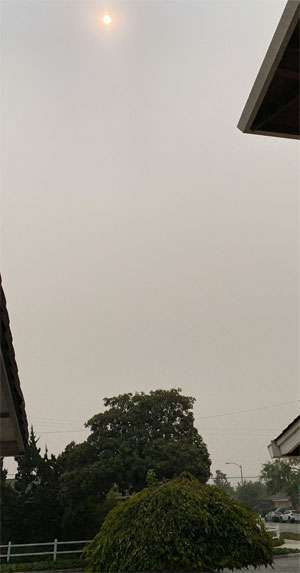
I found that HEPA filters help with smoke too: the current outdoor air quality in California is pretty bad due to the fires caused by recent thunderstorm and lightning. The outdoor air quality index reached “Very Unhealthy” and even “Hazardous” levels in September 2020. Even though doors and windows are shut closed in my house smoke traces still find a way inside especially during windy days. I noticed that having the indoor air purifiers running 24 x 7 keep the indoor air quality index almost always 1.

During windy and heavy smoke pollution days when the outdoor air quality index raises above 200, thanks to my air purifiers, the indoor air quality index never raises more than 5-7 which is still considered “good”.

The Sun is barely shining through the smoky air at 1:00 PM on 11 September 2020. Location: San Jose, CA.

Dust particles in the air are very small but they still differ in size greatly. Measuring a number of particles of 2.5 and 10 micrometers is a standard practice but other sizes of particles can be measured too by using a particulate concentration sensor designed by relying on the laser scattering method. Such sensors are capable of continuous acquisition and computing the number of suspended particles in per unit volume which is also the particulate concentration distribution.

Device shows count of particles of different sizes
M5Stack PM2.5 Air Quality Kit shows particle count of 6 different sizes. The device is 2 x 2″ (5 x 5 cm).

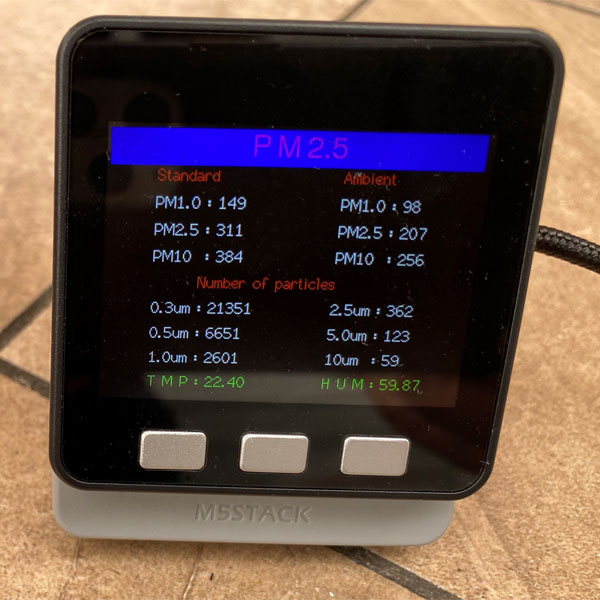
I got a M5Stack PM2.5 Air Quality Kit that is based on the ESP32 micro-controller and a sensor (PMSA003) from Plantower. This device can measure 0.3, 0.5, 1.0, 2.5, 5, and 10 microns (micro meters). It can be used to monitor the air quality as is or can be programmed using Arduino (or other platforms) to extend its functionality.

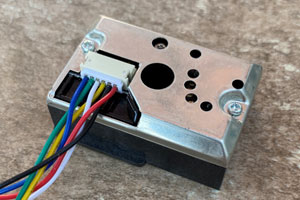
Some other sensors are available for DIY integrations with various micro-controllers.

Equipped with this knowledge, sensors, and air purifiers I can quantify the air quality and make decisions to reduce my family exposure to harmful PM air pollutants. Measuring air quality with my own sensors on demand allows me to get more accurate and more up to date readings compared to weather apps and online websites that show air quality data; also it gives me flexibility of measuring and comparing the air quality indoor, in the garage, and outside.

I think it is important to be mindful about indoor/outdoor air quality, to avoid going outside during bad days, and to ventilate homes during good days. Stay safe. Search about air pollution online to learn more about the topic. I would recommend starting with this article: Why is PM2.5 often higher than PM10?

Board Warping (Cupping and Twisting)

Wood is natural material that sometimes moves unpredictably when moisture in the wood changes unevenly. Chip carving thin boards may release the wood internal stresses on one side of the board and that may lead to board warping, especially cupping.

Probably a half of my chip carved coasters noticeably cup as they are only 1/4″ (6 mm) thick. Let me share what I do about that issue. In most cases I don’t try making them flat as I enjoy using them as is. I like to see how my cup of tea rocks a little on a table. Of cause, it is not very convenient to use a tall wine glass with a cupped coaster. I use that pictured coaster with my morning cup of tea.

Example of a basswood chip carved coaster affected by the board warping. The thin board cupped.
Board Cupping of a Chip Carved Coaster

A few factors make thin boards to cup: moisture content before carving, air moisture level, sometimes heat or direct sunlight. Carving angle and chip sizes may also affect that as the air moisture may penetrate the wood from the carved side much faster.

To make the coasters straight I would suggest a few things.

Before carving:

  • Pick the wood with the straight grain without any defects. Those pieces have minimal internal stresses.
  • Keep the recently acquired wood near your carving place for at least 2-3 weeks before carving where humidity doesn’t change much (home), so the wood moisture level would balance with the environment (acclimatization). Some boards warp (cup or twist) during this stage.
  • You may try submerging the new wood (after acclimatization) in the water for a few (5-20) seconds and let it dry before sanding and/or applying the pattern. If the board warps, it would have been definitely warped after carving. So it is better to detect the warping potential before carving.
  • Carve on the side of the board that was close to the bark when it was inside the log. The reason is that the wood tends to shrink around the pith more than in the outer rings. Also wood tends to shrink around the removed chips. So, carving on the “outer” side of the board may compensate the tendency to cup “inwards”.

While carving:

  • Avoid moving the wood between places with different moisture levels: living room – garage, home – wood carving club, etc.
  • Keep the carving covered with a thick piece of cardboard in between carving sessions to prevent easy access of moisture from the air through the carved chips.
  • Be extra careful and/or avoid using too much water or a mix of water/alcohol to fill the undercutting gaps. One drop of water may be enough to cover an undercutting mistake.

After carving:

  • If the carving is still flat finish it right away. Note that finishing with oils may introduce cupping as the oils penetrate the wood and may mess with the wood a little. I finish my coasters with spray acrylic or refined walnut oil.
  • If a coaster cups very little, sanding the bottom side flat is enough. Even though the carved side will not be completely flat, nobody will notice that most likely.
  • If the coaster heavily warped put it under a heavy stack of books for a month or so before applying a finish. It may be flat or lightly curved after all that weight. You may even experiment and putting a coaster under books in a place where moisture changes a lot, such as garage or even outside.

I heard about this technique but have never tried it yet: wet only one side of the board and let it dry, the cupping will decrease. Repeat until the cupping disappears. Wet the right side of the board 🙂

Overall, moisture makes the wood to move… actually CHANGES in the moisture levels and temperature fluctuations make the wood to move.

All my coasters are 1/4″ thick, 3.75 x 3.75″, basswood. Thicker boards warp (cup or twist) significantly less but thinner coasters look nicer. Please visit the READ N TRY Online Store to review available boards with the coaster patterns that are ready to be carved

Embellishment

Let me share my favorite embellishment technique with you:

Woodburning tip: Skew

I like using a wood burning tool to outline the pattern borders before coloring. That helps me to achieve two things:

  • Emphasize perimeter lines by making them dark/black. Accenting coloring with black lines is a popular technique that some painting artists use (especially water-color and pastel painters).
  • Prevent paint bleeding across the borders. Outlining with a wood-burning tool works similar to scoring borders with a sharp knife. The idea is to cut/separate wood fibers so the paint does not bleed across the borders.

Strawberry Bowl

The “Strawberry Bowl” project was turned from basswood and embellished using the described technique. The bowl is 4” (10 cm). It was painted using felt-tip markers. The finish is acrylic spray.

The markers are very bright and fit the Christmas season very well. Other seasons I like using acrylic paint (heavily diluted with water): it is much easier to handle and it may look bright or soft as needed. I apply at least two coats of diluted acrylic paint to achieve better color-particle distribution that is thin enough to keep the wood grain still visible through.

Turned Bells

These bells were turned from maple and were embellished with diluted acrylics and finished with Tung oil. You may see the grain through the painted leafs. The pieces of maple wood were almost white but after applying oil it darkened the wood a little and exposed the before-non-visible grain.

The embellishment ornaments were drawn, burned, and painted freehand (no stencils used). It required a steady hand, time, and magnifying glasses. Using good paint brushes helps a lot.

Happy Carving & Turning,
Roman

Celtic Knot Pattern

Celtic knots puzzled me when I was a kid. I could not imagine how an endless knot could be tied. The legend about the Gordian Knot made it even more mystical.

Recently I attended a presentation on how to draw a Celtic knot on wooden plates and bowls as a decoration. The presenter, Sharon Doughtie, has done a wonderful job by sharing her techniques, showing the decoration in progress and answering questions.

I wanted to try the learned techniques on a simple project, so I decided to decorate a round coaster – the simplest project ever – with a Celtic knot pattern. I made two coasters from basswood: 3.5″ and 3″ diameter.

Two Celtic Knot Coasters

Two Celtic Knot Coasters

There are many different types of Celtic knots. I wanted to use the endless knot variation of the Basket weave knot. To fit that knot on a round coaster I curved the pattern to fit the knot design into a circle and connected the ends. Well, I didn’t know but I ended up with the Turk’s head knot.

Woodburning Pens

I used a small wood burner to “draw” the knot. First I outlined the lines with the mini skew-chisel woodburning pen and then used the shading pen (see the right picture) to darken the areas near overlapping bends.

To keep the gradient color consistent it is important to complete shading of a Celtic knot without changing the pen tip temperature. I shaded two coasters with different temperature, so the larger coaster is a little darker.

Shading was a real challenge (I spent several hours shading) but I am glad to see the achieved 3D effect on these coasters.