I started woodcarving in Oct 2013. Here is my first chip carving project that I designed and carved after watching a recent movie. Guess which movie has inspired this project.
I wanted to use basic chip carving techniques and carve something that goes beyond repetitive geometrical patterns. By combining classic chip carving elements, a little of freestyle carving and painting I achieved a piece with an easily recognizable story.
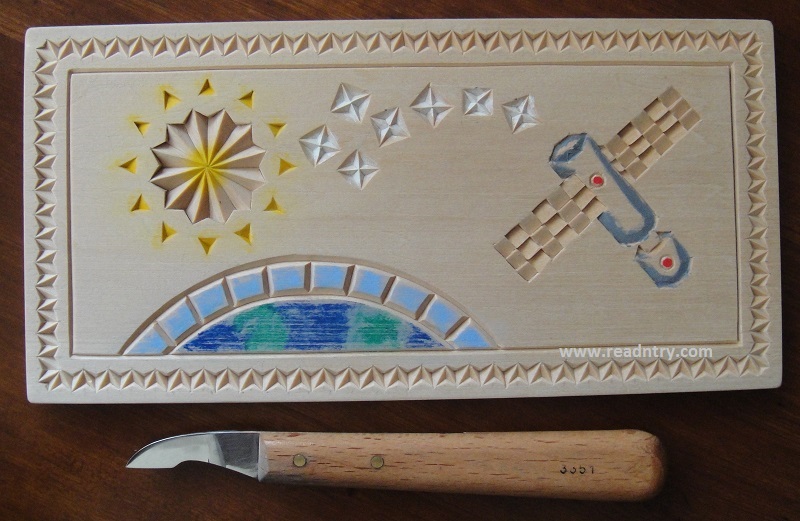
Size: 8″ x 4″ Carved with a single knife shown on the picture.
A small quiz to keep it interesting: what star constellation is carved in this project?
Disclaimer
Please note that working with sharp tools may be dangerous. If you want to repeat the chip carving project learn safety precautions. Always use safety equipment. The information provided with no warranty of any kind — neither expressed nor implied.
Hi Roman;
I just looked at your blog and I recognized the practice board you made me. You are quite a talented guy. You have done some very creative projects. Thanks again for the practice board.
Bruce
Bruce, you are very welcome. I believe that completing a practice board is very important for learning chip carving. Someone prepared a practice board for me and I have learned so many techniques while carving it. I still keep my practice board; it helps me to remember a variety of chip carving patterns.
I am glad that you liked reading about my woodworking projects here. Thank you for the encouraging words.
Привет, Роман! Проект мне очень понравился. Я не знала, что ты умеешь творить такие чудеса. КРАСИВО! А созвездие-” медведица”. Правильно? Желаю больших успехов.
Спасибо за добрые слова! Да, созвездие названо правильно — малая медведица.
Hi Roman,
Thanks so much for all the chip carving information on your site, it’s been very helpful. Can I ask the name of the border pattern in the project above (your first chip carving project)? I’m trying to find a resource to learn how to draw it so I can practice.
Thanks again
Fred
Hi Fred,
Thanks for asking. My teacher who showed me chip carving 35 years ago called that pattern “ёлочка” that means “little fir tree” when translated from Russian. He used that name for other similar patterns too.
The key part about this pattern is that it consists from four-corner chips, where two sides out of four are vertical. Those two sides are carved while holding a knife 90 degrees or so. The 4-corner chips are carved using the same chip carving knife. A stab knife can’t be used for those cuts, as they need to be relatively deep.
You may see more details and more patterns that are formed from 4-corner chips on a practice board that is available on my website: https://readntry.com/blog/4-corner-chip-carving-practice-board/
I hope that answers your question. Than you and happy carving!
Roman