READ N TRY

Roman's website about chip carving, whittling, and woodturning

Chip carving practice board with examples of carving. A pencil is visible on the board.

Chip Carving Practice Board

Chip-carving is a simple way of carving a flat or slightly curved wooden surface that produces faceted chips. Chip carving has been known for thousands of years but very few really old wooden pieces survived to these days as wood deteriorates with time relatively fast. Even now woodworkers often decorate their projects with chip carvings of geometric patterns or free-style figures such as birds or flowers. In this post, I will describe how to sketch a chip carving practice board and share a few traditional chip carving patterns.
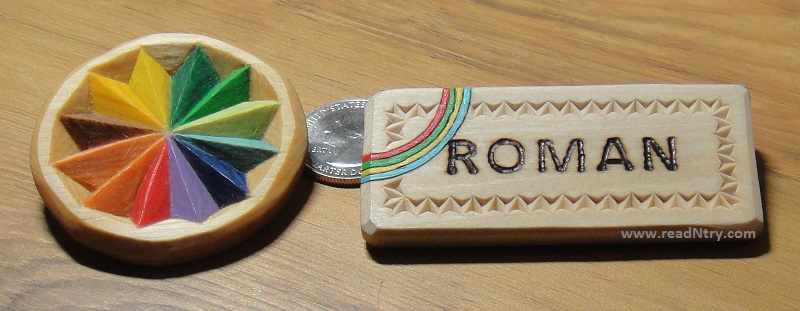
Chip carving examples: photo of a small chip carved rosette and a chip carved name badge.
Examples: chip carved rosette magnet and a name badge.

Chip carving is not difficult. It requires using very few tools and learning just a couple of cuts. Chip carving makes a good and rewarding hobby for a person of any age. If you have a 7-8 year old kid, consider introducing him/her to chip carving. You can start even earlier by carving a whale or a bird from a soap bar with a plastic knife.

Anyone can decorate a cutting board or a wooden box with simple chip carving patterns to make them really stand out. At the same time to achieve exceptional results constant practice is very important.

Learning Chip Carving

My friend started learning chip carving recently. I decided to design a chip carving practice board for him to help him in that exciting journey. A chip carving practice board is a great first-ever project that every chip carving enthusiast should complete and keep as a reminder of becoming a chip carver.

I picked a foot-long basswood board (12″ x 7″ x 3/4″, 30 cm x 18 cm x 1.7 cm) and combined several patterns that I learned from masters through books, the Internet, and my personal experience. I drew geometric patterns on one side of the board. These patterns progress in complexity from top to bottom. This board is designed for cutting not only the simplest three-corner chips but also for cutting advanced four-corner chips and making vertical cuts as well (see the second and sixth rows).
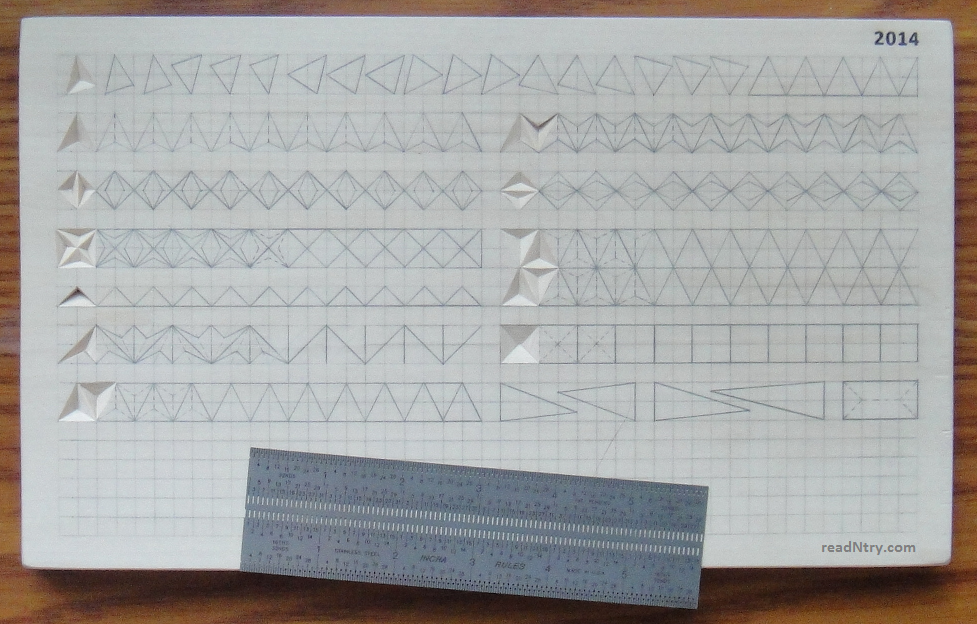
chip_carving_practice_board_1

The other side of the board is for carving rosettes – round figures with a central point (usually but not always). I drew these rosettes using a drafting compass and a ruler. Both sides of the board still have enough space for additional patterns to experiment and practice.
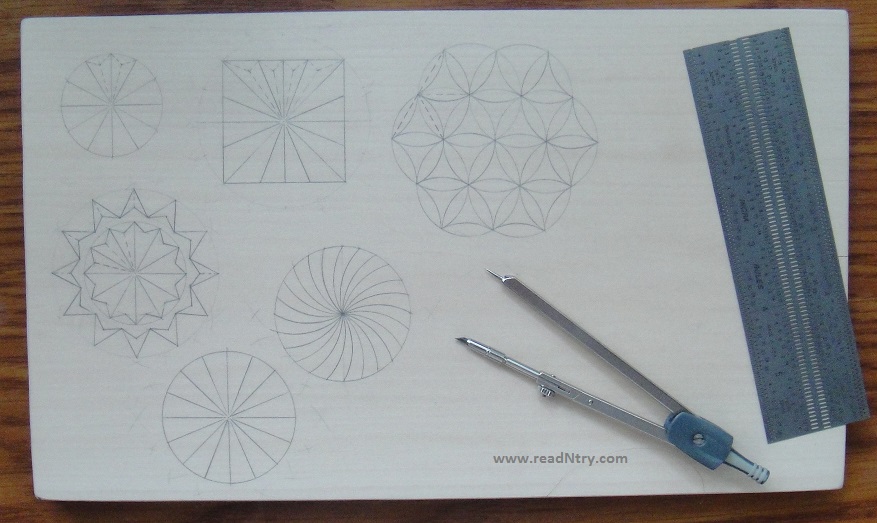
chip_carving_practice_board_2

Chip Carving Tips and Tricks:

• Keep your knife sharp. To check the sharpness of your knife, push the blade on the edge of a piece of paper without any friction or slicing movement. A sharp knife cuts paper easily — the dull blade jams and tears paper. Keep in mind that cutting paper dulls the knife very quickly so don’t overuse this testing technique. Strop is your friend. Note for non-carvers: this test doesn’t apply to kitchen knives unless you are a sushi Chef. 🙂 Strop is a piece of leather (usually glued to a piece of wood) with a sharpening compound on top to polish a knife blade)
• If a chip is large enough it may be easier to remove it by removing a smaller chip within that larger chip first. Then removing the original chip is much easier since the pressure of the inserted knife relieves inwards.
• When removing a chip in a cluster of other chips do the first cut close to the other removed chip. Then do the other two cuts.
• Another way of removing a triangle chip easier is to do three vertical cuts on the lines where facets meet, then cut facets. I guess it is an old, easy, and kind of traditional way of doing chip carving. I think that is called Old-World-Style chip carving. I used it before and now I avoid it. If you would like to excel in chip carving, learn to control the cutting angle perfectly and this technique will not be needed. This technique is good for kids, beginners, and people who used to do that for removing complex chips.
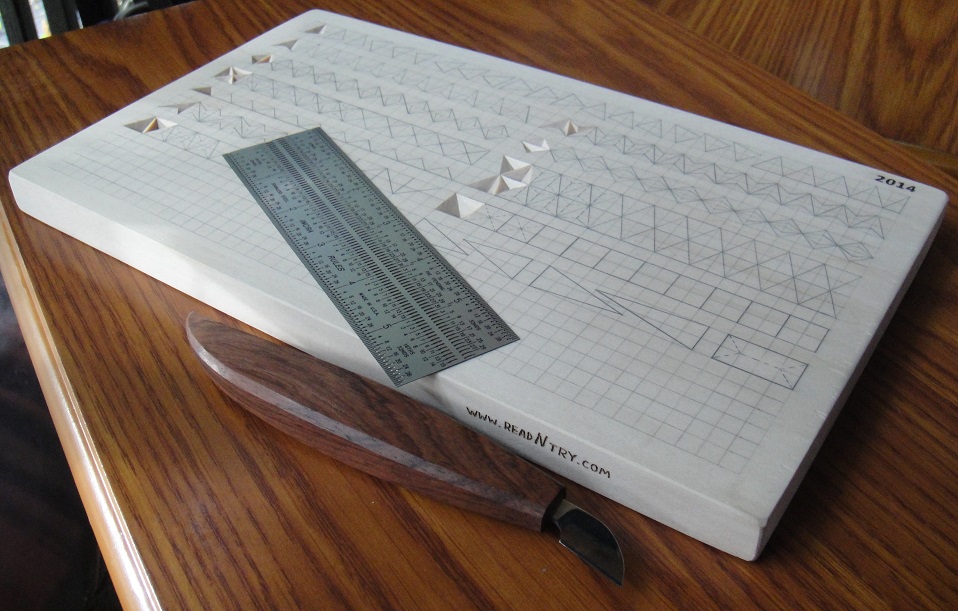
chip_carving_practice_board_3

I hope my friend will enjoy this practice board. Chip carving is a nice and simple way to beautify wooden projects as well as a relaxing, calming, and satisfying experience. Read my article about simple chip carving patterns.

UPDATE: Nov 4th, 2014

In less than a week another friend decided to learn wood carving and here you go — a new chip carving practice board. This time it is a smaller basswood board – just 7” x 4” x 1/4” (18 cm X 10 cm X 6 mm) with similar chip carving patterns. The grid size is a little smaller (3/16” or 5 mm) to make the carving easier. As you can see this practice board has gaps in the patterns. That is intentional. That helps to learn drawing patterns precisely – the paramount skill in chip carving.
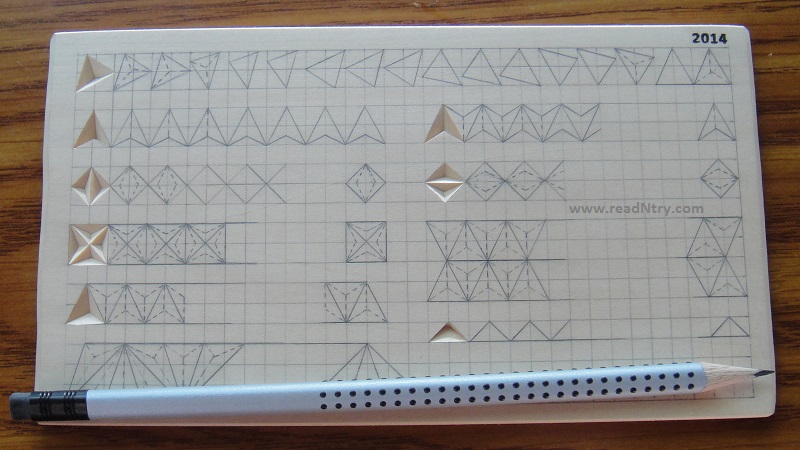
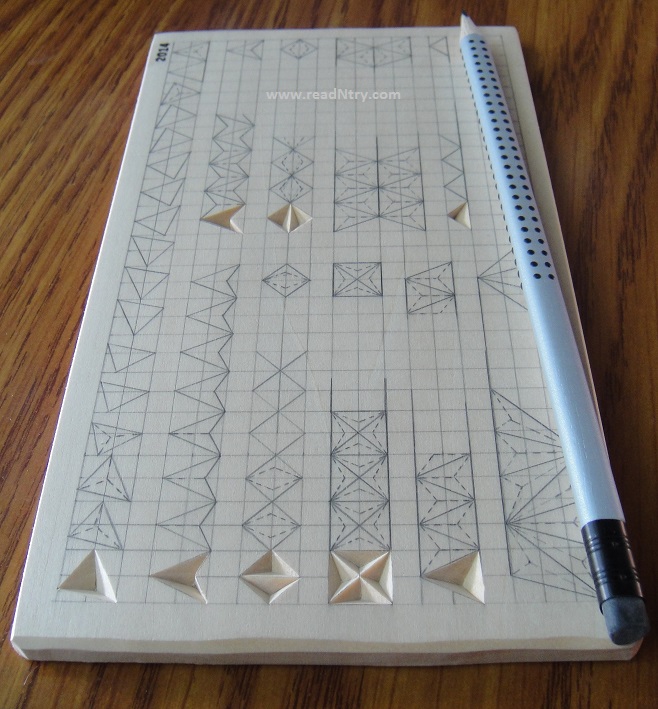
chip_carving_practice_board_4
chip_carving_practice_board_5

UPDATE: Feb 15th, 2017 — Tips for drawing patterns by hand:

I think it is important to learn to draw the patterns manually. This will help to experiment and to design unique one-of-a-kind masterpieces. Here are some tips: draw a grid using a pencil and a ruler. Every cell in the grid should be a square with a side from 3/16” to 1/4” (4 – 6 mm). Connect some cell corners with other cell corners as you wish generally trying to get triangle shapes no bigger than 2-3 cells. Each triangle can be carved as a three-corner chip. Generally smaller grid leads to smaller triangles/chips that are easier to carve.

Sometimes I make a grid with square cells using MS Excel; print the grid on paper and use a pencil to arrange my triangles by hand without a ruler. This helps me to design and to prototype the patterns quickly before drawing them on wood with a ruler.

Drawing rosettes is a little more difficult as it requires a drafting compass and special techniques to split circles into 5, 6, 8, 12, etc. equal parts. Drawing rosettes manually may look overwhelming but it is easy if you learn a couple of tricks. Some chip carving books provide step-by-step techniques of splitting circles and drawing rosettes. The biggest challenge for me working with a drafting compass was to avoid deep needle holes from the compass but I am getting good at it nowadays. 🙂

UPDATE: Feb 19th, 2017 — Roman’s chip carving practice board

I carved several chip carving practice boards over the last few years. Let me share my recent board. It is 4 x 8″ (10 x 20 cm). This board features classic chip carving patterns with 3 corner chips. The last two rows on the left are 4 corner chips and three corner chips with two vertical sides. The bottom right of the practice board features area covered with a grid so it is easy to quickly draw any pattern there to experiment. You may buy a new practice board with the same patterns from my online store. Click on the picture below to zoom in if you enjoy finding little chip carving mistakes 🙂
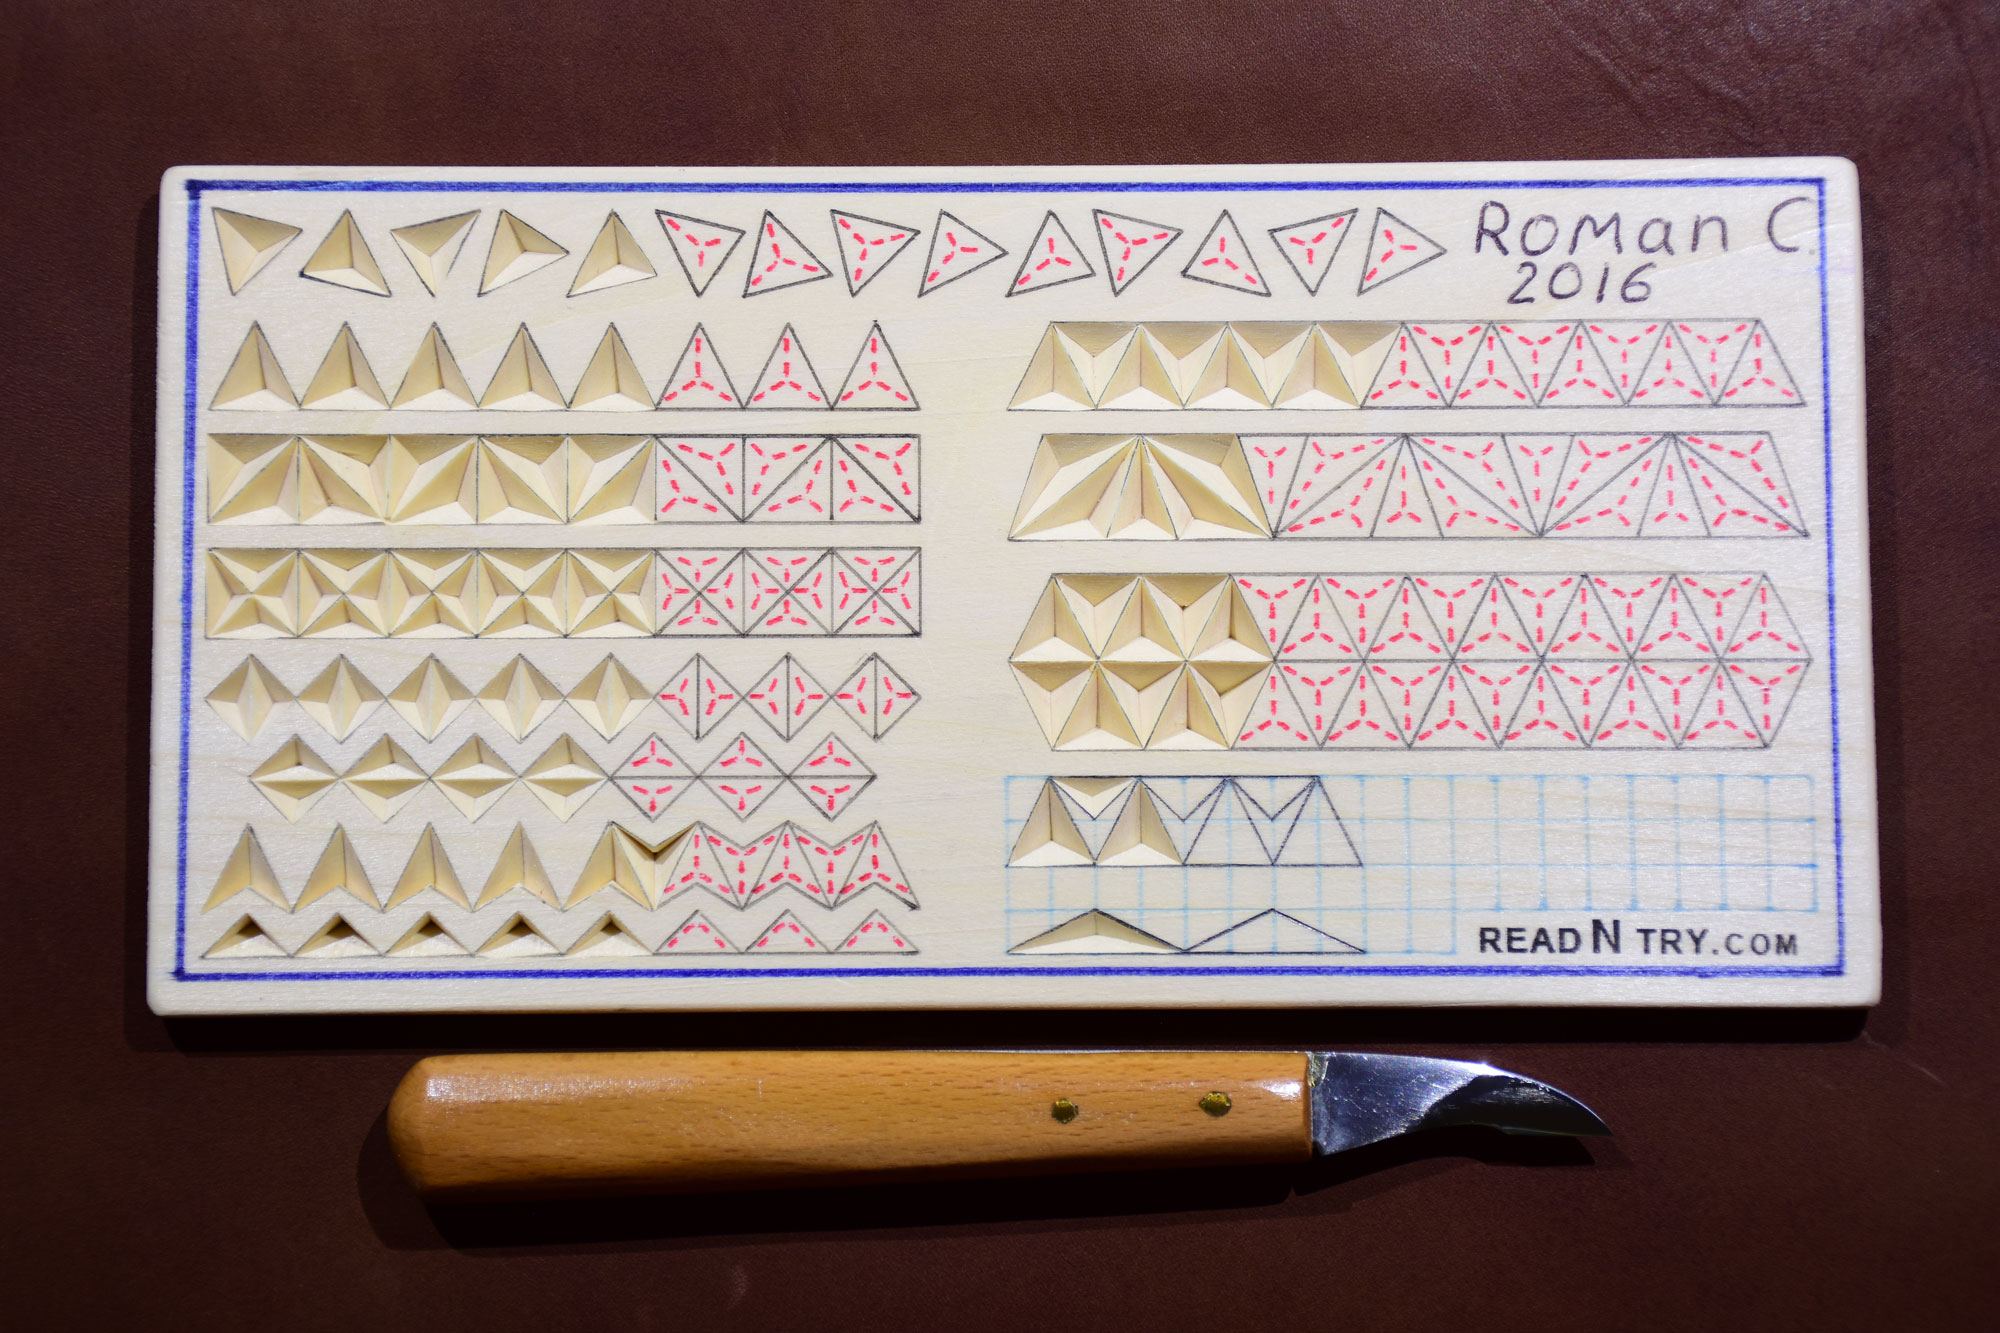
Romans Chip Carving Practice Board

I also designed a rosette chip carving practice board. It is also 4 x 8″ (10 x 20 cm). This board features different rosettes, rings, shells, and other patterns. Most of the chips in the patterns are 3 corner chips. I am planning to carve this rosette chip carving practice board soon:
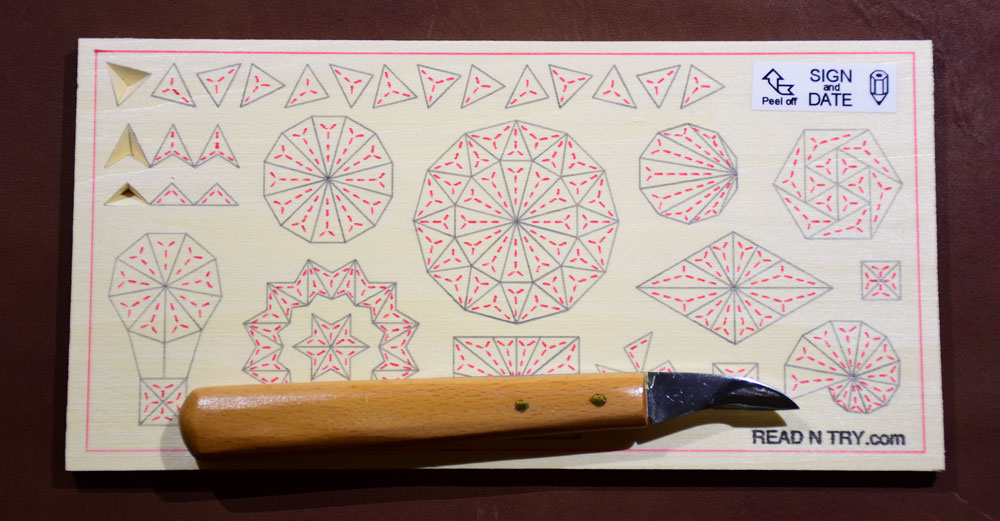
Chip Carving Rosette Practice Board

The rosette chip carving practice board is also available in my online store.

UPDATE: May 3d, 2017 — Now you can buy a Chip Carving Practice Board

Now you also can enjoy these chip carving practice boards.
I am glad to offer them to all chip carving enthusiasts. Visit my online store to buy chip carving practice boards and more. Enjoy!

Comments

30 responses to “Chip Carving Practice Board”

  1. tina hill Avatar

    this inspire both myself and my husband … Do you have a downloadable pattern of this practice shapes that can be printed and transferred to practice pieces? I would be interested in that and I am sure so would other budding wood carvers . Thanks for the great article

    1. Thank you, Tina, for the kind words. I agree, since drawing the chip carving patterns by hand may take hours it is important to simplify the pattern transfer. Since I posted the article I worked on the topic further to automate printing the patterns directly on a board. The automated process avoids faster by still tedious transfer. I will extend this post to bring the article up to date with my recent development.

      As you are the first commenter to this post I would like to thank you and to send two of these chip carving practice boards to you and your husband. Enjoy!

  2. Barbara Green Avatar
    Barbara Green

    I have only been carving for about 6 months. I am bored with doing 8 sided stars. How much do you charge for the practice boards. They would make learning this technique much easier to learn. I live in an area with no other chip carvers and want to try. I got the knives for Christmas.

    1. Barbara, I am sorry to hear that no other chip carvers live nearby but the good news is that the online community is strong. You may find so many amazing projects on the Internet. Books and magazines are great sources for learning and for inspiration.

      I am not selling the practice boards yet but I can offer you a fun deal: I will send you a couple of different boards and you send me one of your carvings when you are ready (maybe one of your 8 sided star?). If you agree please send me a shipping address by email learn@readNtry.com

      When I was 8 or 9 years old one master in a local woodcarving club (that was in Ukraine) introduced me to chip carving and he drew a practice board for me. I am very thankful to this master. I guess that is the reason why I, now leaving in the US – half world away from Ukraine, often give away chip carving practice boards to new chip carvers.

      1. Barbara Green Avatar
        Barbara Green

        Thank you so much .

        1. Thank you, Barbara, for accepting the deal. I will send the package to your address on Monday. Have a great weekend!

  3. Barbara Green Avatar
    Barbara Green

    I received the practice boards. They are wonderful ! I have carved one already! Thank you for your kindness and help. Your stars will be sent next week!
    Barb Green

  4. Krimson Rose Avatar
    Krimson Rose

    Roman,
    This is a beautiful way to practice! Do you have a template I could download to transfer onto wood so I can practice myself? I think this would be perfect when my kids are also going to start learning. I have a way that may work to transfer a pattern from regular paper onto wood, so if you have a template that would be great.
    Or, do you have any tips on how to make one that isn’t going to take what looks like days to do? I don’t know about the patterns much myself, I am just looking into learning, so it looks a bit confusing!
    Your work is beautiful, and I think this would be great for all beginners. Thank you for sharing.
    Krimson Rose

    1. Krimson, thank you for the kind words and for sharing your thoughts.

      I updated the post at the bottom to include some tips for drawing the patterns by hand.

      I would like to propose you a deal: I will send you a chip carving practice board and you share your method of transferring patterns preferraby here in the comment section or privately by email. If you agree please send me a shipping address by email: learn@readNtry.com

      1. Krimson Rose Avatar
        Krimson Rose

        Roman,
        I have two ways that I am trying out, but I am not sure which one will serve me better in the long run.
        1) I print out my pattern on a printer that uses toner (a laser printer). Toner is heat activated to the paper, so heat should transfer it onto other surfaces. I have seen people use a specific woodburning tip called a transfer tip which looks like a mini iron, but I don’t have one of these yet, so I have just used my regular iron. When you print the pattern, set the contrast or toner to be heavy so there is a lot of toner to transfer (don’t use the “toner saving” feature). I tape one side of my paper to the wood, and wait for my iron to heat up, then rub it over the paper that is sitting face down on the wood. If words are used in the pattern, the pattern will need to be reversed. I have to go over it a few times and wait for my iron to heat up because it doesn’t get as hot as a wood burner. If a wood burner is used, rub the tip over a separate piece of wood until it cools enough that it isn’t burning. Constantly move the tip over the paper so the wood won’t be discolored. I will eventually get a wood burning kit that has a transfer tip which will be easier to use than my iron I think. The drawback to this method is that other than sanding, I am not sure how to remove any lines that might remain. However, it is quicker and far more accurate.
        2) A second method I have used which takes a lot more time is to trace the pattern. I print out the pattern, and tape it pattern facing up so the paper won’t move. I then take one of my knitting needles (a ballpoint pen should work to) and trace the pattern onto the wood. This leaves slight indentations in the wood, so there won’t be anything to be erased or sanded at the end. The drawback to this method is that it takes a lot longer and isn’t as likely to be precise. No shaking hands!.
        With both of these methods, the pattern is already on paper, so a ton of measurements don’t need to be made on the wood itself. (I still haven’t found the perfect program for creating a lot of patterns yet, so if anyone knows any recommendations, please share! Free and reasonably priced is preferred. I did come across one called Pattern Wizard found at mychipcarving.com, but it is $71.10!) Maybe google sketch up, or paint would work, but I will need to play with scaling to a paper printout.
        Thank you for all that you are doing to share the art of chip carving!
        Krimson Rose

        1. Krimson, thank you for sharing the transferring methods in detail. It is great that you provided the pros and cons as well as your personal experience using these methods. I hope your details will help other chip carvers.

          I sent the boards to your address, you will receive them soon. Enjoy!

          1. Krimson Rose Avatar
            Krimson Rose

            Roman,
            Got the boards and am practicing away! I liked how on the board you had carved the first chip in the practice lines so I can see how they are supposed to look. This helped me figure out the angles I was supposed to use to get the desired results. I also liked the area that had space for me to draw or incorporate some ideas myself. I used this area to practice merging some of the other designs in various sizes, and to practice some of the harder 4 corner designs.
            I think making these for sale would be great for beginners, and for extra practice for experts. However, if you were to do so, I would see about trying to have a board with curves on it to practice the “free style” and two sided chips as well. I also would recommend slightly thicker board. Around 1/8″ or 3 mm thicker would do the trick. I went through the board on one 3 corner cut. It was my bad, but if I hadn’t been using another board underneath, I might have gotten hurt. Just slightly thicker would alleviate that issue.
            If you do start selling them, let me know, and I’ll probably purchase a few so I can always make sure my skills are staying sharp! I am going to start on the expert one probably this weekend and take a few days to go through it. You were right, taking my time to enjoy it and learn the technique has helped tremendously. Thanks!
            Krimson Rose

          2. You are very welcome, Krimson! I appreciate your feedback. I am very glad that these practice boards help you to enjoy chip carving!

  5. Krimson Rose Avatar
    Krimson Rose

    Roman,
    I have finished both boards! Took me a while, but slowing down and really learning technique helped a ton. A couple of times I was able to get in a good groove and I was able to take complete chips out on the first pass with no little bits left. It is such an amazing feeling to get better with what seems to be a very short amount of time.
    Thank you for sending the boards. If at any time you do put them in production, I will purchase from you as they will help me keep my skills up! I really liked how on the boards I could see potential in making my own designs using simple shapes. This is actually making me appreciate geometry more than I ever have.
    My favorite design was the one on the “expert board” that resides just below the name and date. The hardest one to do for me, and the shapes that continue to be the hardest for me, are the ones with three(four) sides, but two of the sides go almost straight down and the other side(s) is(are) more shallow cuts. These create a great contrast with shading and change the shapes dramatically. It is beautiful, but difficult for me to accomplish in a first cut.
    I appreciate your help with the boards and guidance in improving my skills. I will check back often for more tips and tricks you may share, as well as keeping my eyes open if you decide to sell the boards. Thanks for everything!
    Krimson Rose

  6. Debbie Roncace Avatar
    Debbie Roncace

    Hi Roman, Your practice boards look beautiful. I am very new to chip carving. In fact I am still gathering materials in order to start practicing. I have been crocheting for many many years. Self taught from around the age of 15. I am now nearing 60 and have come to the conclusion that it is time for a new hobby. I have seen many beautiful completed chip carving projects, and though I am a little hesitant to try carving, I think that once I get the hang of it, I can produce some nice gifts for my family and friends.

    Debbie

    1. Thank you, Debbie, for the kind words. I agree, chip carving is a good hobby to enjoy at any age. Chip carving projects may be as small as a fridge magnet or as large as a box or a table. Chip carving is equally rewarding for a beginner or an experienced carver.

      Even though chip carving requires only one knife it is very important to keep it razor sharp. It could be a challenge for a beginner to sharpen his or her knife, especially a new knife. The good news is that the blade is very small so it is relatively easy to make it sharp.

      I can help you with a chip carving practice board. Here is my offer: I will send you a chip carving practice board and you send me a very small crocheting ornament for my collection. If you agree please send me your shipping address to my email: learn@readNtry.com

      Thank you for visiting my website and thank you for your comment!

    2. Debbie, thank you very much for the exchange! Your handmade crocheting ornament is so cute; it is a crown jewel of my collection! Thank you.

  7. Ron Fisher Avatar
    Ron Fisher

    How do I order a practice board, Im new and learning, wonderful site you have,
    thanks
    Ron

    1. Ron, thank you for the kind words. I am glad that you enjoy the website.

      I can sell you a practice board for $20. We can also do an exchange — I will send you a board and you send me a small homemade project that is done by you. If it works for you please let me know your shipping address and the preferred option by email: learn@readNtry.com

      Thank you!

    2. Ron, thank you for accepting the offer! I sent a 3-corner chip carving practice board to your address. I hope you will enjoy the board. Thanks.

      1. Thank you, Ron, for the exchange! I like your item very much. Thanks.

  8. Ken Mazikowski Avatar
    Ken Mazikowski

    Roman: this is the first time I have come across you web site. a wonderful job of chip carving. I am just getting into carving and have been looking through Pinterest and found some sites but nione as good as yours. thanks for the fine work.

    1. Ken: thank you for the kind words. Appreciate it! I enjoy wood carving as a hobby and I like chip carving a lot for many reasons: it is simple but not limited, it requires very few tools, it can be applied to both decorative and utilitarian items, it is relatively safe, and it can be enjoyed at any age.

      I try to have fun with carving and at the same time to help the chip carving community if I can. I am very glad that you found this website helpful. Thank you!

      Please share what type of carving you are currently exploring. Maybe I could suggest something or help you with one of my chip carving practice boards.

      1. Ken Mazikowski Avatar
        Ken Mazikowski

        right now I have been wood burning and thinking of doing some small carvings like landscapes and try a little chip carving as time permits. Let me know what prices you will be chargeing for the boards so I can let friends know. I have been getting the free tutorials that LSirish has been posting as free on her sight. I am going to try the lighthouse one that she made free. I understand that all her work and Art design’s is copy righted so i will be buying some patterns from her as well. Let me know when you are going to teach chip carving and maybe i will take a course if you are in the Phoenix, AZ area. Thanks for being thoughtful to the other folks who have found out about your site as well. got to go now have to go to cardiac rehab tomorrow.

        Ken

        1. I enjoy wood burning sometimes too; I found it is much more challenging than I thought. My carvings are usually small too — keeping it small helps me to carve more different things in the little time I can find for the hobby.

          Different chip carving boards are currently available on the website. Please check the “Shop” section for the prices. I offer free shipping across the country.

          I taught a chip carving class last year — it was fun. I hope to do that again in the future. Thanks for the idea!

  9. Rachael Avatar

    Hi, does your shop ship the boards to the UK or do exchanges there? Id like to start carving and a practice board looks like one of the best things to have, but I wouldn’t be able to see what the chip is supposed to really look like if I just copied a pdf.
    thanks 🙂

    1. Rachael, thanks for asking. Yes, I do ship to Europe. I am not sure what is the shipping cost of sending one board to the UK but it is easy to find out.

      Last time I shipped to Europe it was a parcel of a dozen boards. I think it was cost effective. An envelope with one or two boards may be less expensive. Let me know what chip carving boards would you like to order and I will ask the local Post Office to assess the shipping cost; I will let you know the options.

      Thank you for the kind words and for commenting on the READ N TRY website.

  10. Valerie Palson Avatar
    Valerie Palson

    Good Evening —
    I am a very novice chip carver — have been doing regular relief for four or five years — quite enjoying it !!
    My question — maybe a silly one – is there a simple way to print your designs so they end up the right size ? Mine print out way larger and aren’t really usable ! I’m working with an ipad — might be my problem !
    Thank you — and BTW — I just glue the cut it patterns with clear hobby glue — working ok for me so far –
    Thanks in advance –
    Valerie

    1. Hi Valerie,

      My patterns are usually printed on the boards with mechanical pencils by using specialized hardware. You may see those boards in the “Store” section of the website.

      I have shared my Supernova pattern as a PDF, so the size of the pattern should be preserved when the pattern is printed. Find the PDF on the Santa Clara Valley Carvers website: https://santaclaravalleycarvers.org/chip-carving-patterns-for-beginners/ Consider donating to READ N TRY if you like the pattern.

      Happy carving,
      Roman

  11. Hi, can you use cross stitch patterns for chip carving? This is a great web site

Leave a Reply

Your email address will not be published. Required fields are marked *