A strop is a simple tool that helps a woodcarver keep a knife’s edge razor-sharp during carving sessions. Below, I’ll walk through the steps and design choices for making a DIY strop and will share a few chip carving patterns available for free download at the end of the article. Making your own strop lets you decorate it to suit your style, and it’s usually cheaper than buying a ready-made one.
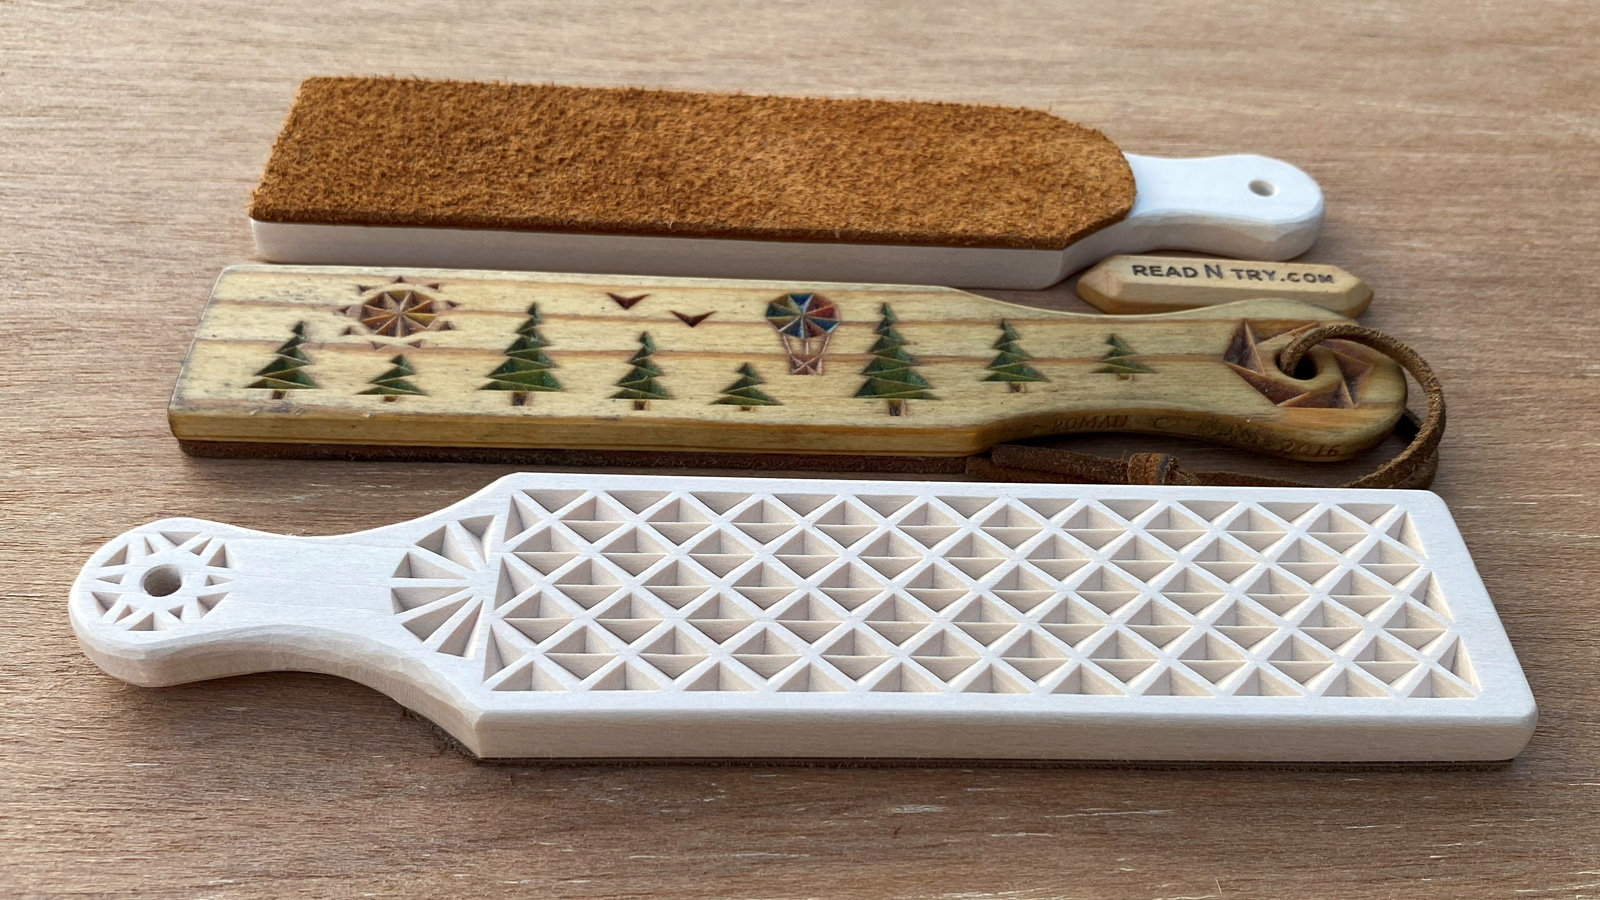
I once made a strop with a chip-carving pattern, entered it in a woodcarving competition at a local woodcarving show, and walked away with a ribbon. I still enjoy that strop that I carved in 2016; see the middle strop in the picture. It is both functional and eye-catching, even if it needs a little cleaning 😉
Below you’ll find a step-by-step guide to making your own leather strop, the key design considerations to keep it functional and attractive, and simple techniques for adding a chip-carving decoration. When you reach the end of the article, a link will let you download the free, printable PDF pattern so you can start carving right away.
Leather, Wood, and Compound: They Keep Your Blade Sharp
A carving strop consists of a piece of leather glued to a wooden stick, with a polishing or honing compound spread on the leather. A strop helps maintain the blade’s sharpness by regularly, usually every 10-20 minutes of carving, rubbing the blade on the leather. Stropping removes the micro-burr raised by sharpening stones. It also polishes an edge to keep it sharp.
Note: A strop cannot restore a dull blade; it only preserves an already sharp edge by shaving off a microscopic amount of metal. With regular stropping, a carving knife can stay sharp for months, but the edge will gradually roll and eventually need to be sharpened on a stone again.
Tip: If you make a strop for knives, don’t use it on gouges as the curved shape of a gouge compresses the leather unevenly, making the strop less effective on flat blades. Use a special strop for gouges instead.
Choosing the Right Width for Your DIY Strop
When you choose the width of a strop, base it on the length of the blade you’ll be stropping. A good rule of thumb is to make the leather at least two-thirds as wide as the blade’s length. Chip carving knives, which have very short blades, work fine on a relatively narrow strop, while whittling knives, which are often 2″ (5 cm) or more across, benefit from a wider surface.
If you’re repurposing leather from an old belt, let the belt’s width set the limit; most belts are about 1 1/4 – 1 1/2″ (4-5 cm) wide, which is a suitable range for most carving knives.
I often make my strops 1 3/4″ (45 mm) wide. Even though that is narrower than the 2 1/4″ (6 cm) blade on my whittling knife, the technique is simple: start at the tip, draw the knife forward along the length of the strop, and slowly slide the blade across the width of the leather. With a bit of practice, the motion feels natural, and the entire blade stays sharp.
Choosing the Right Length for Your DIY Strop
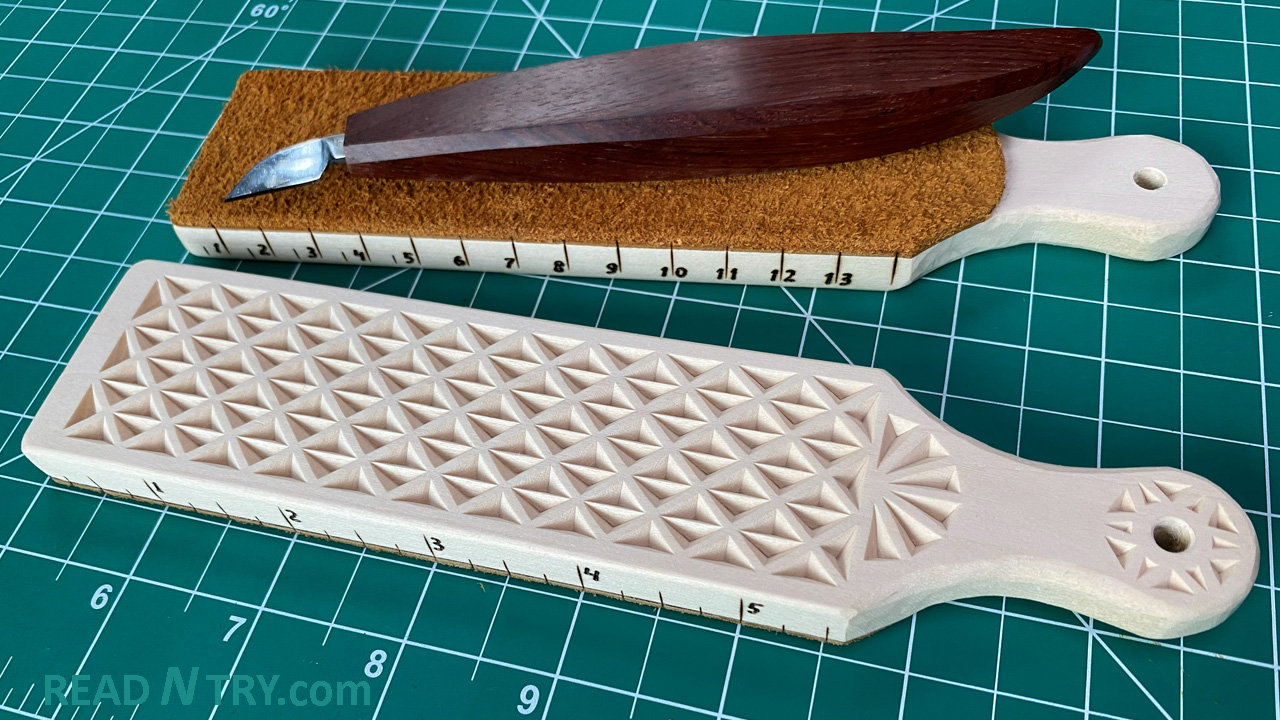
When choosing the length of a DIY strop, consider where you’ll keep it and how you’ll carry it. A 10-12″ (25-30 cm) strop feels stable on a bench, ready for a full, relaxed stroke. For travel or a tool bag, a shorter piece is more convenient. I usually make mine 7 1/2 – 7 3/4″ (19 cm) long, which is also the length of a standard pencil. That size allows me to use a standard pencil box to carry my strop, a carving knife, and a cut-resistant glove when I head out to a carving spot. I leave a 2–3″ (5-8 cm) section un-leathered to serve as a handle, and the remaining length is covered with leather for stropping.
One Side or Two Sides? Balancing Function and Esthetics
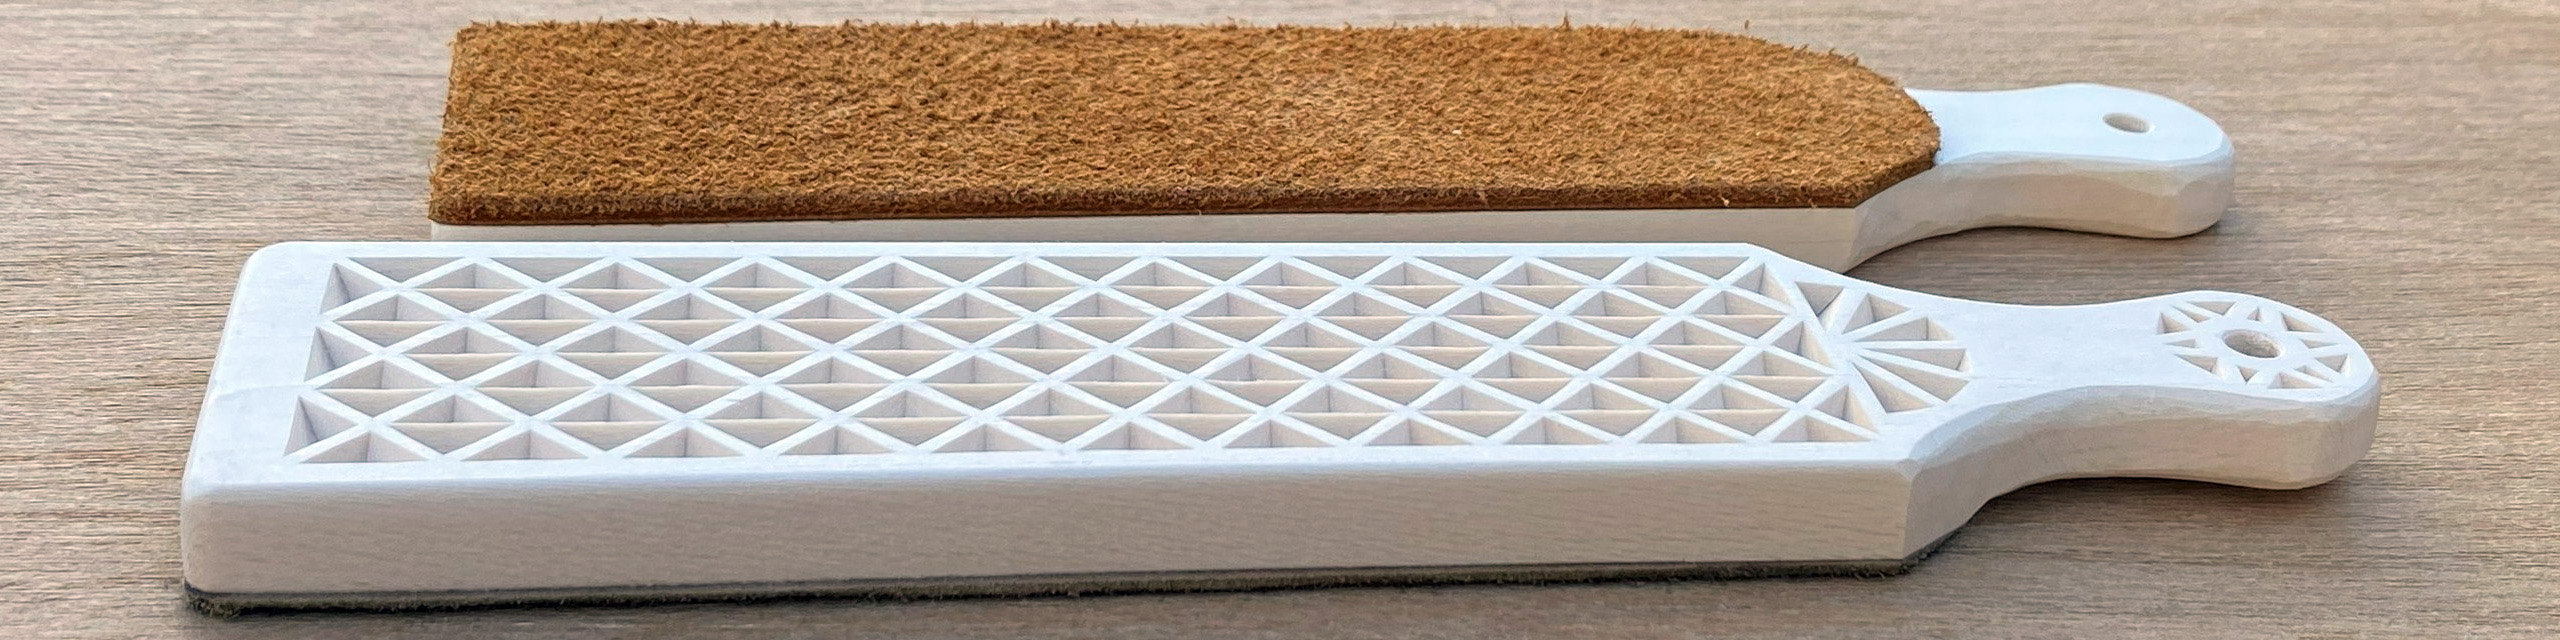
One-sided and two-sided strops each have their own perks. If you glue leather to both faces, you can keep a coarse honing compound on one side and a fine compound on the other. In my experience, the coarse side is useful only briefly, just a few strokes right after using a sharpening stone. Because the fine side handles most of the stropping, I prefer a one-sided strop and leave the blank side for embellishment. A nicely decorated, personal strop makes a great conversation starter among fellow carvers.
Solid Foundations: Choosing a Base for DIY Strops
The base of a strop must be flat and rigid; any flex will spoil the edge you’re trying to polish. Wood is an ideal material for a DIY strop because it’s strong, light, and takes decoration well, such as chip carving, shallow relief, inlay, or pyrography. For most strops, a thickness of 3/8″ (1 cm) provides a solid, stable platform, but a 1/4″ (6 mm) board works fine for small strops or when you use a hardwood with a high Janka rating.
Consider these design choices:
- As a rule of thumb, a wooden strop is usually made between 1/4 and 1/2″ (6-15 mm) thick. Use a quarter-sawn board if possible because it resists warping. Align the grain lengthwise.
- For chip carving, use a 3/8-1/2″ (10-15 mm) basswood board for a solid base. If you want to use a 1/4″ (6 mm) basswood board, keep the chips small to avoid carving through the board.
- For pyrography, light-colored wood or plywood is preferred. Burnish the side before burning, as recommended by pyrography artists.
- To show off a wild or exotic grain, make a strop of any wood you may like, such as walnut, curly maple, or olive wood. The higher the Janka hardness rating, the thinner the wood can be used as a strop.
Carving tip: Adding ruler marks to a strop makes it more functional by turning it into a quick measuring tool, so we can measure without pulling out a separate ruler. I saw its benefit at a whittling contest where only three tools were allowed. Markings on the strop freed up the ruler slot for another tool. Sometimes I put inches on one side and centimeters on the other, as shown in the picture.
Protective Finishes for a DIY Strop’s Wooden Base
Finishing a wood base for a strop is always a good idea for longevity. Finishing also prevents potential deformations, such as cupping or twisting, caused by internal wood stresses and seasonal changes in air moisture. I suggest using a penetrating oil-based finish, such as boiled linseed oil (BLO), because it makes the wood scratch-resistant, unlike a surface finish. However, an oil-based finish may highlight the grain, potentially interfering with embellishment such as chip carving or pyrography. In that case, using a surface finish is fine, such as acrylic spray.
Leather and how to attach it to wood
Attach a piece of leather to the wooden base with the rough (flesh) side facing up. First, cut the leather to match the base’s dimensions, then give the wood a light rub with sandpaper and wipe both surfaces clean. For a permanent bond, spread a thin layer of contact cement on the leather and the wood, let the glue become tacky, and press the two pieces together firmly. If you think you’ll want to replace the leather later, use rubber cement instead; it creates a semi-permanent joint that can be peeled off when needed.
Below are the extra points you should keep in mind when choosing the leather:
- Almost any leather will do. Even an old belt, a scrap from a bag, or a piece of vegetable-tanned hide works fine as a strop surface.
- Thickness matters. Thicker leather is more forgiving for beginners who are still mastering the stropping angle. At the same time, a thinner sheet lets experienced carvers remove less metal from the edge.
- Leather isn’t the only option. Some professional carvers skip leather entirely, using a soft piece of wood or MDF as the strop and applying the honing compound directly to the surface.
Honing Compounds: Abrasive Powders & Pastes
Honing compounds consist of abrasive particles, sometimes sold as powders or blocks, mixed with oil and wax for easy application. Abrasive particles in most compounds range from 0.5 µm to 70 µm; that’s roughly the size of a bacterium (≈1 µm). Choose a grit that matches how often you sharpen: finer for routine stropping, coarser only right after a stone sharpening session.
My personal preference is a green rouge, a fine green buffing compound made from chromium oxide, traditionally used since the mid-19th century. The abrasive particles in the green compound are between 0.3 and 1 microns in size (depending on the manufacturer), chemically stable, and they produce a mirror-like finish on metal. The hardness of chromium oxide is about 8 on the Mohs hardness scale, which is harder than the various types of steel, which are 5-7 on the scale, so the green compound works well for honing carving knives.
Tip: If the honing compound won’t stay on the leather, the most common culprits are a dry or overly stiff surface and a compound that’s been thickened with wax. Lightly rub a few drops of leather conditioner or mineral oil into the leather to restore some flexibility. When the compound itself contains wax, warm it gently with a heat gun; the heat softens the wax, allowing the compound to spread evenly across the leather. After treating the leather, re-apply a thin layer of honing compound, and you should see good adhesion.
The Last Stroke: Why DIY Strop Matters
Building a wooden DIY strop is a low-cost project that gives you a tool tailored to your knives and your style. The steps are straightforward, the materials are easy to find, and once it’s finished, you’ll have a reliable way to keep your carving edge sharp so you can enjoy woodcarving safely.
Download Chip Carving Patterns for DIY Strops
Find the strop patterns below. Most of these chip carving patterns are free, with an instant PDF download available:
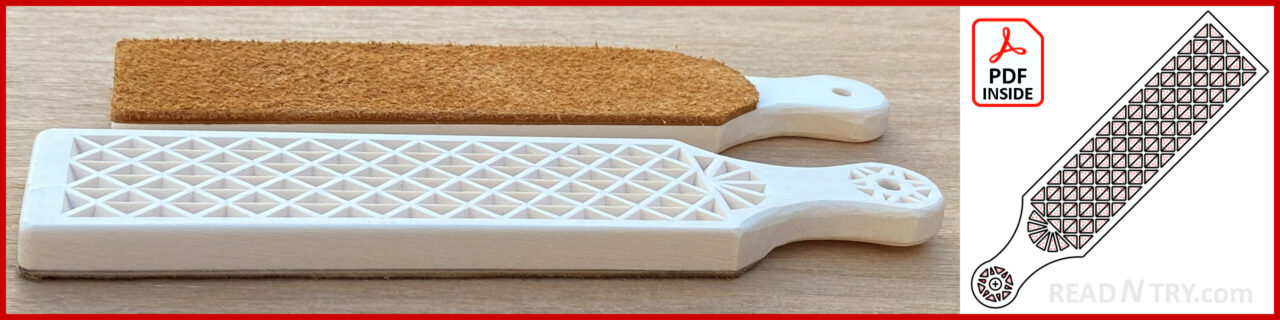
Simple Strop Chip Carving Pattern
With a free chip carving pattern as a PDF file.
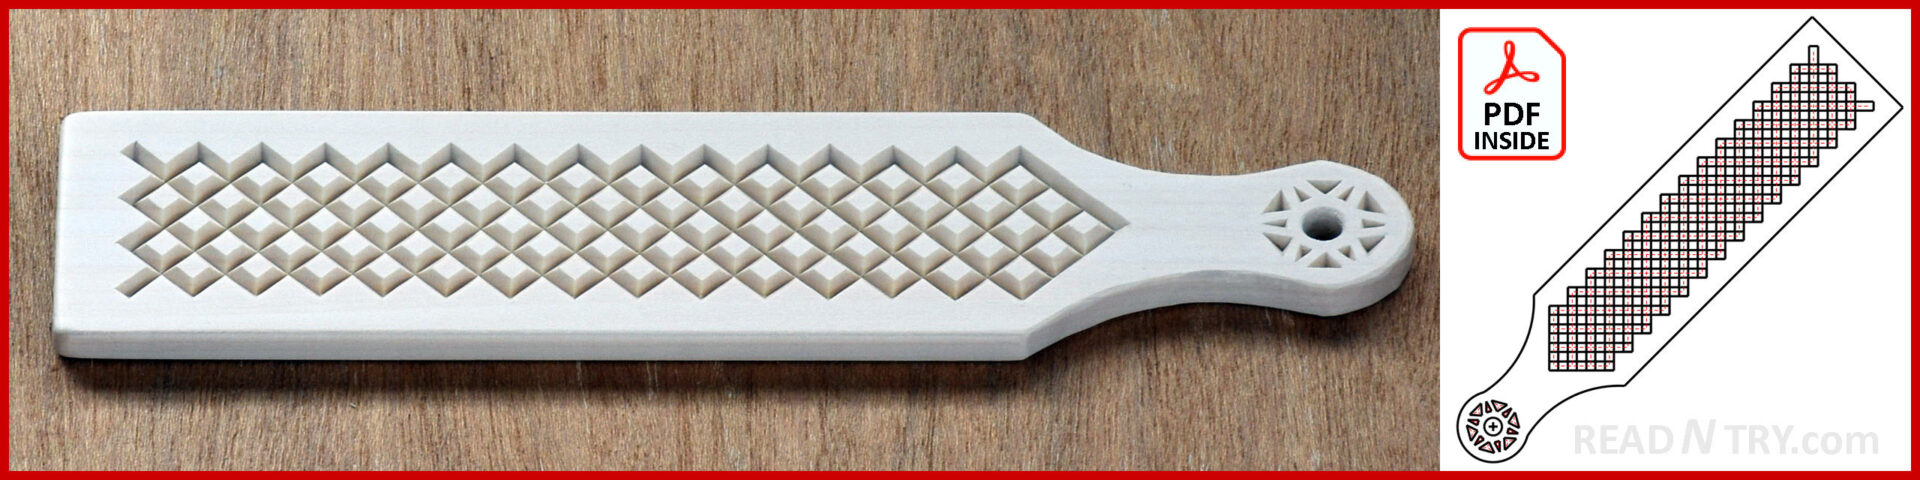
Chip Carving Pattern for Decorating Leather Strops: Crossing Lines
With a free chip carving pattern as a PDF file.
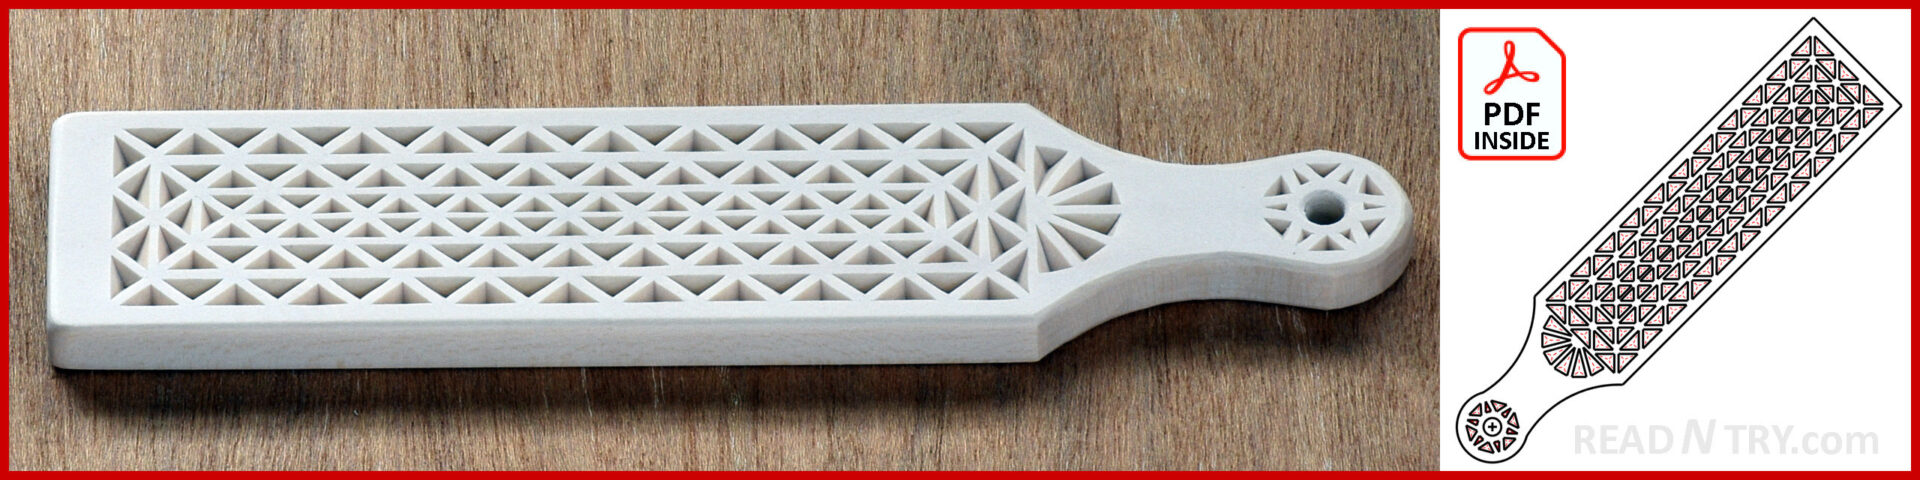
Chip Carving Pattern for a DIY Strop: Chip Layers
With a free chip carving pattern as a PDF file.
Forest Chip Carving Pattern for making DIY Leather Strops
PDF pattern only: $3
Size: 1 3/4 x 8 inches (44 x 197 mm). Purchased PDF files will be delivered by email within 24 hours of payment.

Pick one of the strop patterns and give it a try, experiment with different woods or decorative touches. Please share photos of your DIY strop. Happy carving and happy stropping!
Leave a Reply